


How to Sew Different Types of Sleeves: Why Sleeve Design Matters
Sewing sleeves can be one of the most satisfying parts of garment-making. Sleeves not only protect our arms and add comfort but also define the overall style and personality of a garment. From traditional Kurti sleeves to elaborate Marmaluke designs, understanding how to cut, measure, and sew different types of sleeves is essential for any dedicated sewer. This guide will take you through the most popular types of sleeves, along with practical tips, mistakes to avoid, and proportional advice.
Basics: How to Sew, Measure, and Cut Sleeves
Before diving into specific sleeve types, let’s cover the basics:
-
Measuring Your Arm and Garment
-
Arm Length: Measure from the shoulder point to the wrist or desired length.
-
Bicep and Wrist Circumference: Helps determine sleeve width.
-
Armhole Depth: Essential for a comfortable fit.
-
-
-
Always add seam allowances (typically 1.2–1.5 cm).
-
Consider ease: a fitted sleeve requires less ease, while a puff or balloon sleeve requires more.
-
-
Sewing Techniques
-
Gathering: Used for puffed, drawstring, or poet sleeves.
-
Pleating: Common for frill, Juliet, or epaulet sleeves.
-
Flat vs. Set-in: Set-in sleeves require precise armhole matching, while flat sleeves can be attached more easily.
-
-
Common Mistakes to Avoid
-
Skipping seam allowances.
-
Misaligning the sleeve cap with the shoulder.
-
Ignoring fabric stretch or drape.
-
Overcrowding gathers or pleats.
-
Types of Sleeves and How to Sew Them
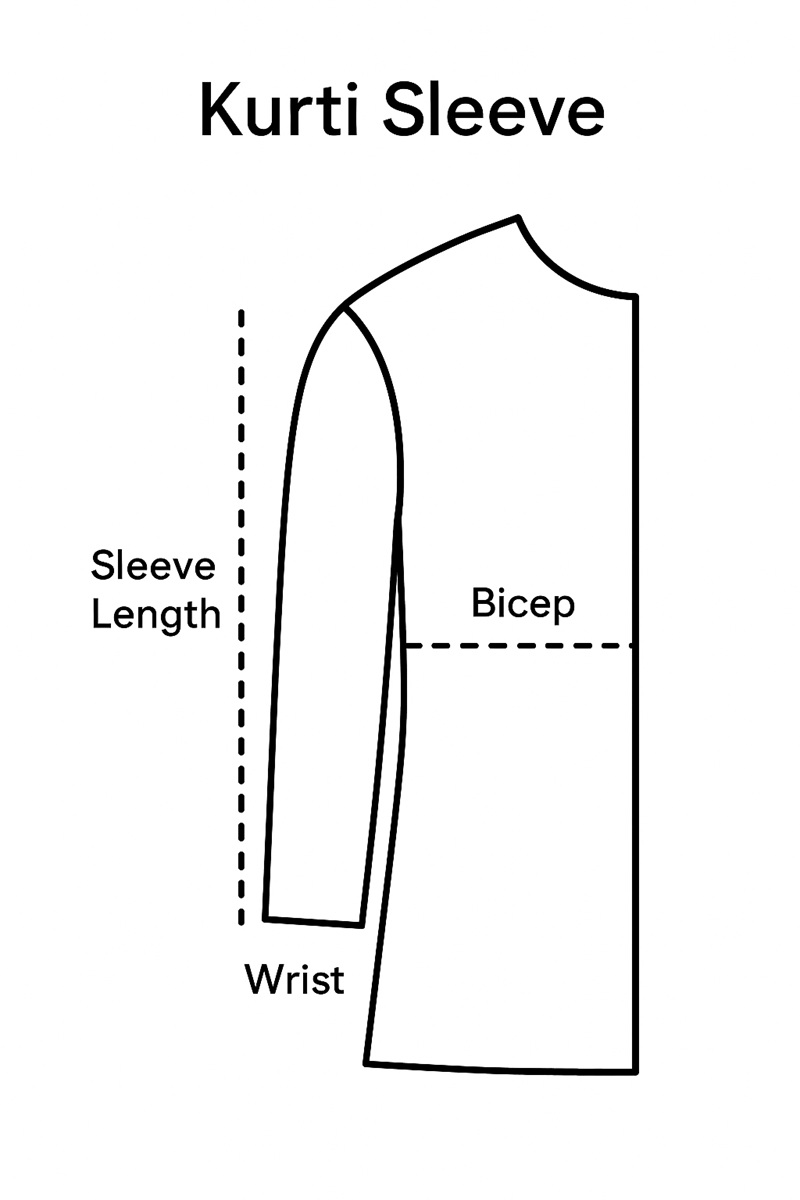
1. Kurti Sleeve
A traditional sleeve found in Indian-style Kurtis. Usually straight or slightly tapered.
Tips: Use soft cotton or silk. Keep the width loose for comfort. Sew with a small hem for neat finishing.
How to Cut and Measure a Kurti Sleeve
A well-fitting sleeve can completely change the look of your Kurti. The key is accurate measurements and neat cutting. Let’s go step by step.
Step 1: Take Accurate Measurements
You’ll need a measuring tape, your pattern book (or fabric), and a pen or chalk for marking.
Here are the main sleeve measurements to take:
-
Armhole (Round Arm):
-
Measure around the fullest part of your armhole — this is where your sleeve will attach to the body of the Kurti.
-
Note this measurement; it helps you shape the sleeve cap correctly.
-
-
Sleeve Length:
-
Decide what kind of sleeve you want — short, elbow-length, ¾, or full.
-
Measure from the top of your shoulder (where the armhole seam meets) down to where you want the sleeve to end.
-
-
Sleeve Round (Wrist or Hem):
-
Wrap the measuring tape around your arm at the point where your sleeve will end.
-
This measurement controls how tight or loose your sleeve bottom will be.
-
-
Bicep Round (Upper Arm):
-
Measure around the fullest part of your upper arm.
-
Add at least 1 inch (2.5 cm) for comfort or ease.
-
Step 2: Prepare the Fabric
-
Fold your fabric lengthwise with the right sides facing each other.
-
Make sure the folded side is straight — this will be the center of your sleeve.
-
Keep the sleeve length plus 1 inch for seam allowance.
Step 3: Mark the Sleeve Pattern
Now, with your chalk and ruler, start marking on the folded fabric.
-
Top Line (Sleeve Cap Line):
-
Draw a horizontal line near the top edge — this will be your starting line.
-
-
Sleeve Length:
-
Measure downward from the top line equal to your sleeve length and draw a parallel line.
-
This is the hemline.
-
-
Sleeve Width (at Bicep):
-
From the folded edge, mark half of your arm round + 1 inch for ease.
-
-
Sleeve Opening (at Hem):
-
On the hemline, mark half of your wrist round + 1 inch.
-
-
Armhole Curve (Sleeve Cap):
-
Measure about ⅓ of the armhole round vertically down from the top line.
-
Draw a smooth curve connecting from the top folded edge to the sleeve width mark — this curve is the sleeve cap.
-
Make sure it’s slightly deeper at the front side and shallower at the back.
-
Step 4: Connect the Marks
-
Join the sleeve cap curve down to the bicep width line.
-
Then draw straight lines connecting to the hem width.
-
You should now have the basic sleeve shape drawn out.
Step 5: Cut the Sleeve
-
Pin the fabric layers together to keep them in place.
-
Cut carefully along the outer chalk line.
-
Don’t forget to add seam allowances — usually ½ inch on the sides and 1 inch on the hem.
Step 6: Check the Fit
-
Before attaching the sleeve to your Kurti, fold it lengthwise and press lightly with an iron.
-
Place it against your armhole to see if the sleeve cap matches the armhole curve.
-
Make small adjustments if necessary.
Extra Tips
-
Add a notch at the center of the sleeve cap — it helps align the sleeve properly when stitching.
-
Mark front and back sides of the sleeve to avoid confusion.
-
Always press seams flat after sewing for a clean finish.
-
For a perfect drape, use lightweight cotton, rayon, or lawn fabric for Kurtis.
Quick Reference Chart
| Measurement | Description | Example |
|---|---|---|
| Armhole | Around the shoulder joint | 16 inches |
| Sleeve Length | Shoulder to wrist | 18 inches |
| Bicep Round | Fullest upper arm | 12 inches |
| Wrist Round | Around wrist | 8 inches |
| Ease | For comfort | +1 inch |
Once you learn how to cut and measure a Kurti sleeve properly, you can experiment with different sleeve styles — puff, bell, gathered, or flared — all using the same basic pattern. Accuracy is everything, so always measure twice and cut once!
2. Tsunami Long Sleeve
A dramatic, flowing sleeve that flares from the elbow.
Sewing Tip: Cut generously for the flare. Add a French seam for a clean inside finish. Avoid overly tight shoulder seams, which can restrict movement.
How to Cut and Measure a Tsunami Long Sleeve
A Tsunami long sleeve usually refers to a stylish, relaxed-fit long-sleeve shirt often made from cotton, jersey, or polyester blends. Getting the right measurements and cuts ensures a clean fit and professional finish.
Tools You’ll Need
-
Measuring tape
-
Tailor’s chalk or fabric marker
-
Fabric scissors or rotary cutter
-
Ruler or straight edge
-
Pins or clips
-
Pattern paper (optional)
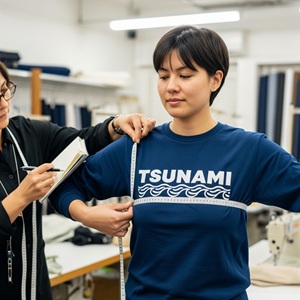
Step 1: Take Accurate Body Measurements
Before cutting your fabric, measure the person (or yourself) carefully. Record these measurements:
-
Chest/Bust:
Wrap the tape measure around the fullest part of the chest and add 2–3 cm for comfort ease. -
Waist:
Measure around the natural waistline (the narrowest part). -
Hip (optional):
For looser Tsunami fits, take a hip measurement around the widest part. -
Shoulder Width:
Measure from one shoulder tip to the other across the back. -
Sleeve Length:
From the shoulder tip down to the wrist bone. Add 2–3 cm for hemming. -
Armhole Depth:
Measure from the shoulder tip vertically down to the armpit. -
Wrist Circumference:
Wrap around the wrist and add about 2 cm for movement. -
Shirt Length:
Measure from the top of the shoulder (near the neck) down to your desired hemline.
Step 2: Draft or Trace the Pattern
You can either use a pattern or trace an existing Tsunami long sleeve you like.
-
Lay your old shirt flat on pattern paper or fabric.
-
Trace around it with chalk, leaving 1.5 cm seam allowance around all edges.
-
Ensure the sleeve curve (armhole) matches perfectly to avoid tightness.
If you’re drafting from measurements:
-
Draw a rectangle using your chest width ÷ 2 as the horizontal line and shirt length as the vertical line.
-
Mark the shoulder slope, neck width, and armhole depth according to your measurements.
Step 3: Cutting the Fabric
-
Lay your fabric flat on a cutting table with the right sides facing each other (folded lengthwise).
-
Pin your pattern securely.
-
Use sharp fabric scissors for clean edges.
-
Cut:
-
1 Front piece
-
1 Back piece (can be cut on the fold)
-
2 Sleeves
-
Optional: Cuffs, neckband, or waistband for a fitted finish.
-
Tip: Always check fabric stretch direction — Tsunami long sleeves often use stretchy fabrics, so make sure the stretch runs across the body for comfort.
Step 4: Mark and Match
After cutting:
-
Mark all notches, center points, and sleeve caps with small snips or chalk marks.
-
This helps when joining the pieces accurately.
Step 5: Assemble the Long Sleeve
-
Join the shoulder seams (front and back pieces).
-
Attach sleeves: Match the top of the sleeve cap to the shoulder seam and pin around the armhole before stitching.
-
Sew the side seams from the sleeve hem to the bottom of the shirt.
-
Finish edges with zigzag stitch or overlocker to prevent fraying.
-
Hem the sleeves and bottom edge by folding twice (1–1.5 cm) and stitching neatly.
Step 6: Final Touches
-
Try on the shirt before finishing the neckline.
-
Adjust the fit if needed (slimmer sides, shorter sleeves, etc.).
-
Attach the neckline band or hem the raw edge neatly.
Extra Tips
-
Always pre-wash your fabric before cutting to avoid shrinkage later.
-
Double-check symmetry—fold both sleeves together to ensure they match.
-
For a trendy Tsunami-style look, experiment with color blocking or curved hemlines.
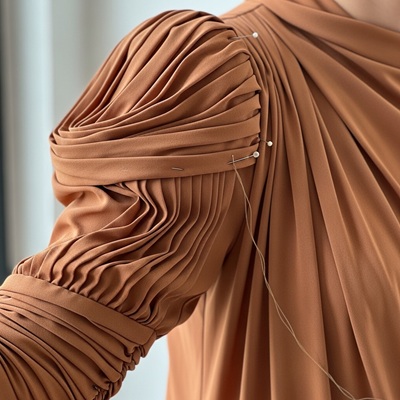
3. Beauregard Sleeve
To get a perfect Beauregard sleeve, accurate measurement and neat cutting are essential.
What You’ll Need
-
Measuring tape
-
Pattern paper or drafting paper
-
Pencil or tailor’s chalk
-
Ruler or French curve
-
Fabric scissors
-
Your fabric (lightweight fabrics like chiffon, satin, or silk work beautifully)
Step 1: Take Your Body Measurements
Before you start cutting, you need the following key sleeve measurements:
-
Armhole depth – Measure from the top of the shoulder down to the bottom of the armhole.
-
Sleeve length – Measure from the shoulder tip down to where you want the sleeve to end (usually at or past the wrist).
-
Biceps circumference – Measure around the fullest part of your upper arm.
-
Wrist circumference (or opening width) – Measure around your wrist or decide how wide you want the sleeve opening to be.
-
Elbow length (optional) – Measure from the shoulder to your elbow, if you want to control where the fullness begins.
Write these down carefully — they’ll guide your cutting.
Step 2: Draft the Basic Sleeve Block
Use a standard long-sleeve pattern or draft one using your measurements:
-
Draw a vertical center line equal to your sleeve length.
-
Mark your biceps line (around 5–7 inches below the top for adults).
-
On the biceps line, draw half of your biceps measurement plus 1 inch for ease on each side of the center line.
-
Shape the sleeve cap (the top curve) smoothly using a French curve or by hand.
This creates your basic sleeve foundation.
Step 3: Add the Beauregard Flare
This is where the magic happens.
-
From the elbow level, mark how much flare you want — Beauregard sleeves are wide and flowing, so you can add 4 to 10 inches (10–25 cm) or even more on each side at the wrist.
-
Use your ruler to draw a gentle flare from the elbow point to the wrist edge.
-
Make sure both sides are symmetrical.
-
The wrist edge should form a soft curve, not a sharp angle, for a smooth drape.
Step 4: Add Seam Allowance
Add:
-
½ inch (1.3 cm) around the armhole and side seams
-
1 inch (2.5 cm) at the wrist or hem for turning and finishing
If your fabric frays easily, add a bit more allowance.
Step 5: Cut the Fabric
-
Lay your fabric flat, folded in half with the right sides together.
-
Pin your pattern on top, aligning the grainline properly (parallel to the fabric edge).
-
Carefully cut around the outline, keeping smooth, steady cuts — especially at the flare area.
-
Mark notches or points for sewing alignment (like the top of the sleeve cap and elbow line).
Step 6: Sew and Finish
-
Join the sleeve underarm seam.
-
Attach it carefully to the armhole, matching the notches.
-
Finish the hem — you can leave it wide and flowing or add lace, gathers, or cuffs for a custom touch.
Tips for a Perfect Beauregard Sleeve
-
Use light or medium-weight fabric to maintain a soft, elegant drape.
-
If you want extra fullness, slash and spread your pattern: cut the lower part of your sleeve pattern vertically into 3 or 4 parts, spread them apart evenly, and trace a new outline.
-
Always press your seams lightly after sewing for a professional look.
The Beauregard sleeve combines elegance and drama — it transforms a simple blouse or dress into a timeless piece. With accurate measurement and careful cutting, even a beginner can achieve that sophisticated look often seen in fashion.
4.Melon Sleeve
Rounded, dome-like sleeves with soft gathers.
Cutting Tip: Ensure symmetry on both sides for balance.
Sewing Tip: Use a basting stitch to gather evenly before final stitching.

How to Cut and Measure a Melon Sleeve
A melon sleeve is a stylish puffed sleeve with rounded fullness that resembles the shape of a melon. It’s elegant, feminine, and often used in blouses, dresses, and traditional outfits. To get that perfect curved puff, you’ll need accurate measurements and careful cutting.
What You’ll Need
-
Measuring tape
-
Pattern paper or fabric
-
Pencil or tailor’s chalk
-
Ruler or French curve
-
Scissors
-
Pins
Step 1: Take the Necessary Measurements
You’ll need the following key measurements:
-
Armhole circumference:
Measure around the armhole of the bodice where the sleeve will be attached. -
Bicep or upper arm round:
Measure around the fullest part of the upper arm. -
Sleeve length:
Measure from the shoulder point to where you want the sleeve to end. -
Desired puff height:
Decide how full you want the melon sleeve to be (typically 3–6 inches of extra fullness).
Step 2: Draft the Basic Sleeve Block
-
Draw a basic short-sleeve pattern using your measurements.
-
Mark the center line from the shoulder point down to the hem.
-
Indicate the front and back armhole curves properly.
This basic sleeve block will be your foundation for creating the melon shape.
Step 3: Slash and Spread to Add Fullness
-
On your basic sleeve block, draw vertical lines from the sleeve cap down to the hem (about 3–5 equal divisions).
-
Cut along these lines — but leave a tiny hinge at the sleeve hem so the pieces stay connected at the bottom.
-
Spread the slashes evenly apart (the more you spread, the fuller the puff).
-
For a medium puff: spread each section about 1–1.5 inches.
-
For a dramatic melon shape: spread up to 2–3 inches.
-
-
Place the spread pattern on another sheet of paper and trace around it, smoothing out the top curve.
Step 4: Shape the Sleeve Cap
To achieve that soft, rounded melon look:
-
Raise the sleeve cap by 1–2 inches above the original cap line.
-
Use a French curve or freehand to blend the curve smoothly.
-
Ensure the armhole measurement still matches the bodice armhole (adjust if needed).
Step 5: Add Hem and Seam Allowances
-
Add ½ inch seam allowance around the edges.
-
Add 1 inch hem allowance at the bottom if the sleeve will be finished with a band or elastic.
-
Label all pattern pieces clearly (front, back, grainline).
Step 6: Cut the Fabric
-
Fold your fabric right sides together.
-
Pin the sleeve pattern on the fabric following the grainline.
-
Cut carefully around the pattern.
-
Mark notches at the sleeve head and center points for easy joining later.
Step 7: Sew and Gather
-
Sew two lines of loose gathering stitches along the sleeve cap.
-
Pull the threads gently to create gathers.
-
Attach the sleeve to the armhole, matching notches and evenly distributing gathers.
-
Finish the hem with a band or elastic to form the puffed “melon” effect.
Pro Tips
-
Use light to medium-weight fabrics like cotton, organza, or silk for better puff.
-
If you want extra volume, you can add tulle or interfacing inside the sleeve cap.
-
Always press seams gently with steam to keep the rounded shape.
Summary
| Step | Action | Key Point |
|---|---|---|
| 1 | Take measurements | Armhole, bicep, sleeve length |
| 2 | Draft sleeve block | Use a basic sleeve as a foundation |
| 3 | Slash & spread | Add fullness for a melon shape |
| 4 | Shape sleeve cap | Raise the top curve for the round puff |
| 5 | Add allowances | Include seam and hem |
| 6 | Cut fabric | Follow the grainline and mark notches |
| 7 | Sew & gather | Create the melon puff |
5. Gauntlet Sleeve (Pointed)
Tapers sharply toward the wrist.
Feature: Adds a sharp, elegant silhouette.
Proportion Tip: Measure carefully from elbow to wrist for a snug fit.
How to Cut and Measure a Gauntlet Sleeve
A gauntlet sleeve is a stylish sleeve design often used in shirts, blouses, and jackets. It features a slit opening and a cuff extension that allows the hand to pass through easily while giving a neat and tailored finish. You’ll often see it on formal shirts or traditional garments.
Let’s go through how to measure, draft, and cut a gauntlet sleeve accurately.
Step 1: Take the Basic Sleeve Measurements
Before drafting, take these key measurements from the person or pattern:
-
Arm Length – Measure from the shoulder tip down to the wrist.
-
Bicep Round – Measure the fullest part of the upper arm.
-
Elbow Length – Measure from the shoulder to the elbow.
-
Elbow Round – Measure around the elbow (when slightly bent).
-
Wrist Round – Measure around the wrist where the cuff will sit.
-
Sleeve Opening (Gauntlet Length) – Decide how long you want the sleeve slit (commonly 5 to 6 inches for shirts).
Write these down neatly — you’ll use them to shape the sleeve pattern.
Step 2: Draft the Basic Sleeve Block
-
On your pattern paper, draw a vertical line for the length of the sleeve.
-
At the top, draw a horizontal line to mark the bicep line.
-
Measure the bicep round ÷ 2 on each side of the line and connect.
-
From the bicep line, measure down to the elbow and then to the wrist.
-
Mark the elbow and wrist rounds ÷ 2 on each side of the center line.
-
Connect all the points smoothly to form the sleeve shape.
This is your basic sleeve block.
Step 3: Mark the Gauntlet Opening
Now that you have your sleeve shape:
-
On the back seam of the sleeve (usually the underarm side), mark a line 5 to 6 inches long from the wrist upward — this is your gauntlet slit.
-
Cut along this line carefully when cutting fabric.
-
Remember to add seam allowance (about ½ inch) along the slit for neat finishing later.
Step 4: Cut and Prepare the Gauntlet Piece
You’ll need a separate strip of fabric for the gauntlet placket.
-
Gauntlet Length: 6 inches (or same as your slit length + 1 inch).
-
Width: 2½ to 3 inches wide.
-
Fold it in half lengthwise and press.
-
The wider side will show on the outside, while the narrow side will stay underneath the opening.
Cut two pieces — one for each sleeve.
Step 5: Attach the Gauntlet Placket
-
Place the gauntlet strip right side to right side with the sleeve opening.
-
Stitch along the slit line, ending in a narrow V-shape at the top of the slit.
-
Cut through the slit to the stitching point (be careful not to cut the stitches).
-
Turn the gauntlet piece to the right side, fold the edges in neatly, and press.
-
Topstitch around the edges to secure and create a clean finish.
Step 6: Add the Cuff
After attaching the gauntlet placket, the sleeve is ready for the cuff.
-
Cut your cuff pieces according to wrist measurement + 1 inch for seam allowance.
-
Sew the cuff onto the wrist edge, ensuring the placket overlaps neatly.
-
Finish with buttons or snaps.
Step 7: Final Press and Check
-
Press the sleeve neatly, especially around the gauntlet and cuff area.
-
Check that both sleeves are the same length and width.
-
Make sure the placket overlaps correctly on both sides.
Quick Tips
-
Always use interfacing on the gauntlet strip and cuff for structure.
-
Make a test sleeve using scrap fabric if you’re a beginner.
-
Mark the right and left sleeves to avoid confusion when sewing.
-
Keep all lines straight and symmetrical for a professional look.
6. Poet Sleeve
Loose, flowing, often gathered at the shoulder and cuff.
Sewing Tip: Use lightweight fabrics like chiffon or georgette.
Mistake: Too heavy fabric can weigh the sleeve down, losing the romantic effect.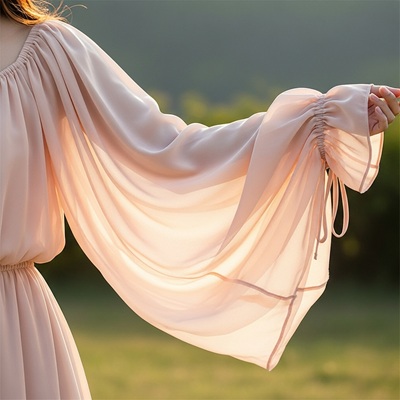
How to Cut and Measure a Poet Sleeve
The poet sleeve is a romantic, billowy sleeve often seen in vintage and bohemian fashion. It’s gathered at the wrist and sometimes at the shoulder, giving a soft, flowing look. You can easily create it once you understand how to measure and cut the fabric correctly.
What You’ll Need
-
Measuring tape
-
Fabric (lightweight cotton, chiffon, satin, or linen works best)
-
Tailor’s chalk or fabric marker
-
Scissors
-
Pattern paper (optional)
-
Elastic or cuff band (for the wrist)
Step 1: Take Your Measurements
To cut a perfect poet sleeve, you need three main measurements:
-
Armhole circumference
Measure around your upper arm where the sleeve will attach to the bodice. Add 2–3 inches for ease. -
Sleeve length
Measure from your shoulder down to where you want the sleeve to end—usually just past the wrist or mid-hand for a dramatic look. Add 1 inch for seam allowance. -
Wrist circumference
Measure around your wrist or the point where the sleeve will be gathered. If you’re adding elastic, note that the wrist opening should be smaller than your armhole to create fullness.
Step 2: Determine the Sleeve Width
The fullness of a poet sleeve depends on how wide you make the pattern.
-
For a soft puff, add 4–6 inches to your armhole measurement.
-
For a dramatic, flowing sleeve, add 8–12 inches or more.
Example:
If your armhole is 15 inches, your sleeve width could be 21–27 inches.
Step 3: Draft the Sleeve Pattern
You can draw it directly on fabric or use pattern paper first.
-
Draw a rectangle using your sleeve length and desired width.
-
Mark the top edge as the armhole side.
-
Slightly curve the top edge to fit the shoulder shape.
-
On the bottom edge (wrist side), mark a center point.
-
From this point, you can gently taper the sides inward toward the wrist if you want a more fitted cuff area.
-
Leave it wide if you’re gathering it with elastic.
-
Step 4: Add Seam Allowances
Add ½ inch to 1 inch around all edges for seam allowance.
If you plan to insert elastic or cuffs, add an extra inch at the wrist end for folding the casing.
Step 5: Cut the Fabric
Fold your fabric in half (right sides together) and pin the pattern.
Cut along your drawn lines, keeping the folds even.
You should now have two identical poet sleeve pieces.
Step 6: Sew the Sleeve
-
Sew the underarm seam (from armhole to wrist).
-
Gather the top edge slightly if you want a puffed shoulder.
-
Attach the sleeve to your bodice armhole.
-
Finish the wrist:
-
For a cuff: Sew on a separate cuff piece.
-
For elastic: Fold the hem, stitch, and insert the elastic through the casing.
-
Step 7: Final Touches
-
Press your seams neatly.
-
Adjust gathers so they look even.
-
Try on the sleeve to make sure the fullness and length feel comfortable.
Tips for a Beautiful Finish
-
Lightweight fabrics give the best drape.
-
Use French seams for a neat inside finish.
-
For a vintage look, add lace or small buttons at the cuff.
-
If using sheer fabric, consider lining the upper sleeve for strength.
7. Gibson Girl Sleeve
Full at the shoulder and upper arm, tapering at the wrist.
Cutting Tip: Add extra ease at the top for the fullness.
Feature: Gives a vintage, Edwardian look.
How to Cut and Measure a Gibson Girl Sleeve
The Gibson Girl sleeve is one of the most elegant and romantic sleeve designs from the early 1900s. It’s full at the top, gently gathered at the shoulder, and narrows gracefully toward the wrist. The effect is soft and feminine — perfect for blouses, dresses, or historical-inspired garments.
Here’s how you can measure, draft, and cut a Gibson Girl sleeve step by step.
What You’ll Need
-
Measuring tape
-
Pattern paper or brown craft paper
-
Pencil and ruler (or French curve)
-
Fabric (lightweight cotton, lawn, voile, or silk for soft drape)
-
Scissors
-
Pins
Step 1: Take the Right Measurements
Before drafting, you need accurate sleeve measurements. Have the wearer stand straight and relaxed.
Measurements required:
-
Arm length: From the shoulder point to the wrist bone.
-
Upper arm circumference (bicep): Around the fullest part of the upper arm.
-
Wrist circumference: Around the wrist, where the cuff will end.
-
Armhole depth: From the top of the shoulder down to where the sleeve should attach under the arm.
-
Shoulder to elbow: This helps to control the puff distribution on the upper sleeve.
Write down all these measurements before starting your draft.
Step 2: Draft the Basic Sleeve Pattern
-
Draw a vertical line equal to the arm length. Label the top as the shoulder line and the bottom as the wrist line.
-
From the top, mark the armhole depth (usually ¼ of bust measurement + 1 inch for ease). Draw a horizontal line — this will be your bicep line.
-
From this point, mark half of your bicep circumference + 2 inches for ease on both sides of the vertical line.
You now have the basic sleeve block.
Step 3: Create the Gibson Girl Puff
The signature of this sleeve is the soft fullness at the top. You’ll add this by slashing and spreading the upper part of your sleeve pattern.
-
Draw 3–4 vertical lines from the sleeve cap down to the bicep line (do not cut through the bottom).
-
Cut along these lines up to the bicep line, leaving a tiny hinge.
-
Spread the pieces apart about 2 to 3 inches each, depending on how puffy you want the sleeve top to be.
-
For a soft puff: spread 2 inches.
-
For a dramatic puff: spread 4 inches.
-
-
Tape the spread pieces onto another sheet of paper and redraw the sleeve cap curve smoothly.
This creates the fullness at the sleeve head that gives the Gibson Girl sleeve its signature romantic shape.
Step 4: Shape the Lower Sleeve
The Gibson Girl sleeve narrows gracefully from the elbow to the wrist.
-
Measure down to the elbow line (usually halfway between the shoulder and the wrist).
-
From that point, taper the sleeve gently to match your wrist measurement (plus ease for comfort, about 1 inch).
-
Extend the wrist line slightly if you plan to attach a cuff.
You should now have a sleeve that’s wide and full at the top, narrowing softly toward the wrist.
Step 5: Cut and Add Seam Allowances
Add ½ inch seam allowance around all edges, and 1 inch at the hem if needed. Cut the sleeve pattern out of your paper.
Then, lay it on your folded fabric (fold along the grainline). Pin it securely and cut around the pattern.
Step 6: Sewing Tips
-
Gather the sleeve cap: Stitch two rows of gathering stitches along the top curve between the front and back notches.
-
Ease the gathers: Pull the threads gently to fit into the armhole.
-
Attach to the bodice: Sew with the right sides together, easing in the fullness at the shoulder.
-
Finish the wrist: Add a narrow cuff, lace trim, or buttoned band for an authentic Gibson Girl finish.
Extra Tips
-
Use lightweight fabric for a soft puff or crisp cotton for a more dramatic effect.
-
To exaggerate the volume, insert a light sleeve support (a small piece of tulle or organza) inside the puff.
-
Always make a muslin mock-up before cutting your final fabric — it helps adjust the puff height and sleeve fit perfectly.
Final Look
When done right, the Gibson Girl sleeve frames the shoulders beautifully and creates that graceful, early 1900s charm — perfect for blouses, Edwardian-inspired dresses, or even modern romantic outfits.
8. Mahoitres Sleeve
Unique, draped sleeve with folds and pleats.
Sewing Tip: Pin pleats before stitching.
Mistake: Uneven pleats ruin the aesthetic.
What Is a Mahoitres Sleeve?
A Mahoitres sleeve (also called a Marie sleeve) is a historical, puffed sleeve style popular in the Renaissance period. It features large, rounded puffs at the upper arm or shoulder, often gathered or slashed for decoration, while the lower sleeve fits more closely to the arm.
You’ll often see this style in period gowns or dramatic costume designs.
Tools and Materials You’ll Need
-
Measuring tape
-
Pattern paper or fabric for drafting
-
Scissors
-
Ruler or French curve
-
Pencil or tailor’s chalk
-
Fabric (cotton, satin, or any structured material)
-
Pins
Step 1: Take Accurate Body Measurements
You need three main sleeve measurements:
-
Armhole (Sleeve Cap) Circumference – Measure around your armhole where the sleeve will attach.
-
Arm Length – From shoulder point down to your wrist (or the desired sleeve length).
-
Bicep Circumference – Around the fullest part of your upper arm.
For the Mahoitres sleeve, you’ll add extra fullness to the upper part (puff area).
Step 2: Draft the Basic Sleeve Block
-
Draw a vertical line equal to the arm length.
-
At the top of the line, draw a horizontal line representing the sleeve cap width (usually your armhole circumference divided by 2, plus 1 inch for ease).
-
Shape the sleeve cap curve using a French curve or freehand — smooth from front to back.
This is your basic sleeve shape.
Step 3: Add the Mahoitres Puff Extension
-
Mark the bicep line (the point where the sleeve’s widest part sits — usually ⅓ down from the top).
-
From this line upward, extend the sleeve cap by 3 to 6 inches (depending on how big you want the puff).
-
The more you add, the fuller your puff.
-
-
Redraw the sleeve cap smoothly, blending the extra height into the original shape.
You now have an exaggerated sleeve cap that creates the puffed Mahoitres look.
Step 4: Slash and Spread (for Volume)
To add natural roundness:
-
Draw vertical lines from the sleeve hem up to the new sleeve cap — about 5 or 6 lines evenly spaced.
-
Cut along these lines, but don’t cut all the way through; leave a tiny hinge at the top.
-
Spread each section by 1–2 inches to create even fullness.
-
Tape the spread pattern onto another sheet of paper and redraw the outline smoothly.
Step 5: Cut and Sew the Sleeve
-
Cut your fabric according to the final pattern.
-
Gather the top edge of the sleeve between the notches (the puff area).
-
Pin and attach it carefully to the armhole — distribute the gathers evenly.
-
Sew the underarm seam, then attach any cuff or fitted lower portion if desired.
Optional: For a dramatic look, use lining or tulle under the puff to keep its shape.
Pro Tips
-
Use stiffer fabrics (taffeta, cotton poplin, satin) for structured puffs.
-
Always balance gathers evenly before stitching.
-
To prevent drooping, you can add light interfacing or tulle underneath the puff section.
Summary
| Step | Action | Purpose |
|---|---|---|
| 1 | Take measurements | Accurate fit |
| 2 | Draft basic sleeve | Foundation |
| 3 | Extend upper sleeve | Create puff |
| 4 | Slash & spread | Add fullness |
| 5 | Sew and gather | Shape the Mahoitres puff |
9. Hanging Sleeve
Soft, draped fabric falling from the shoulder.
Fabric Tip: Choose silk or satin for a graceful hang.
Sewing: Avoid stiffness; use minimal interfacing.
What Is a Hanging Sleeve?
A hanging sleeve is a fabric tube sewn to the back of a quilt or wall hanging so that a rod can be inserted to hang it flat and neatly. It’s essential if you plan to display your work at home, in galleries, or in exhibitions.
Step 1: Measure the Width of Your Quilt or Wall Hanging
Lay your quilt or wall hanging flat on a table and measure its top edge from one side to the other.
-
This measurement determines how long your sleeve will be.
-
Subtract about ½ inch (1.3 cm) from the total width so that the sleeve won’t show at the edges.
Example:
If your quilt is 40 inches wide, → Cut your sleeve fabric 39½ inches long.
Step 2: Determine the Width of the Fabric Strip
The height (width of the strip before folding) depends on the finished depth of the sleeve you want.
For standard quilt hanging sleeves:
-
Cut your fabric strip 8½ to 9 inches wide.
This size will give you a 4-inch finished sleeve, which fits most display rods used in shows or exhibitions.
Step 3: Cut the Fabric
Use a rotary cutter, ruler, and cutting mat for accuracy.
Cut one strip:
-
Length: ½ inch shorter than quilt top width
-
Width: 8½–9 inches
Choose a sturdy cotton fabric — ideally, the same weight as your quilt backing fabric.
Step 4: Finish the Short Edges
-
Fold ¼ inch of each short end to the wrong side and press.
-
Fold again another ¼ inch to enclose the raw edges.
-
Stitch along the inner folded edge to make clean, hemmed ends.
This prevents fraying and gives a neat finish.
Step 5: Fold and Sew the Long Edge
-
Fold the strip in half lengthwise, right sides together.
-
Sew a ¼-inch seam along the long edge.
-
Press the seam open carefully.
You’ll now have a long fabric tube.
Step 6: Position and Press the Sleeve
Turn the tube right side out and press so that:
-
The seam lies slightly below the center on the back side.
(This helps the sleeve hang flat when a rod is inserted.)
If you’re using a large hanging rod, press a small pleat or tuck (about ½ inch) along the back edge to give extra space for the rod. This prevents the front of the quilt from bulging.
Step 7: Attach the Sleeve to Your Quilt or Hanging
Pin the sleeve to the top back edge of your quilt — about ½ inch below the binding.
Then:
-
Hand-stitch along the top edge, sides, and bottom edge of the sleeve.
-
Use small, invisible stitches that don’t go through to the quilt front.
Leave both sleeve ends open so a rod can slide through.
Quick Measurement Summary
| Quilt Width | Cut Sleeve Length | Cut Sleeve Width | Finished Sleeve Width |
|---|---|---|---|
| 30 in | 29½ in | 8½ in | 4 in |
| 40 in | 39½ in | 8½ in | 4 in |
| 50 in | 49½ in | 9 in | 4½ in |
| 60 in | 59½ in | 9 in | 4½ in |
Pro Tip
If your wall hanging is very small, you can make a narrow sleeve — about 2 to 3 inches finished width — by starting with a 5–6 inch strip instead of 8–9 inches.
10. Over Sleeve
Layered over another sleeve for design effect.
Sewing Tip: Make sure the underlying sleeve is finished neatly.
Feature: Adds volume and texture.
Here’s how to cut and measure an oversleeve (sometimes called an “overarm sleeve” or “outer sleeve”), whether you’re making one for a blouse, dress, jacket, or a detachable sleeve design.
What You’ll Need
-
Measuring tape
-
Pattern paper or plain fabric for drafting
-
Pencil or tailor’s chalk
-
Ruler or French curve
-
Scissors
-
Fabric of choice
-
Pins
Step 1: Take Accurate Body Measurements
Before cutting, measure the arm carefully — oversleeves often fit more loosely than regular sleeves.
Key Measurements
-
Armhole (Arm Circumference at Shoulder) – Measure around the fullest part of the upper arm where the sleeve will attach.
-
Bicep Circumference – Around the widest part of the upper arm.
-
Sleeve Length – From the shoulder point to where you want the sleeve to end (wrist, elbow, or short length).
-
Wrist or Hem Circumference – Around your wrist or the point where the sleeve ends.
-
Ease Allowance – Add 2–4 cm (¾–1½ inches) for comfort and style (oversleeves are typically looser).
Step 2: Draft the Oversleeve Pattern
You can make the sleeve directly on pattern paper or muslin fabric.
Basic Drafting Steps
-
Draw a Vertical Line Equal to your sleeve length. This is your center line.
-
Mark the Top (Cap Line) – At the top of the line, draw a horizontal line for the sleeve cap width.
-
Divide Armhole Measurement by 2 – Use this to determine the width of the top line.
-
Shape the Cap Curve – Using a French curve or freehand, draw the sleeve head curve connecting both ends of the top line to a point about 2–3 cm below the top center (for ease and roundness).
-
Mark Bicep Line – About 5–6 inches down from the cap, draw a horizontal line; this should equal your bicep measurement + ease.
-
Mark Wrist Line – At the sleeve’s end, mark the wrist circumference + ease.
-
Join Bicep Line to Wrist Line – Connect both sides smoothly.
For a fuller or puffed oversleeve, extend the sleeve cap height or add width to the bicep line before joining down.
Step 3: Add Seam Allowance
Add 1.5 cm (⅝ inch) seam allowance all around the sleeve pattern.
Add 2–3 cm (1 inch) hem allowance at the wrist or sleeve opening.
Step 4: Cut the Fabric
-
Fold your fabric right sides together.
-
Place the sleeve pattern on the fold or grainline (parallel to the fabric edge).
-
Pin it down securely.
-
Cut carefully along the outline.
Repeat if you need a pair (left and right sleeve).
Step 5: Optional — Add Design Variations
Oversleeves can be styled differently depending on your design:
-
Gathered Top – Add 2–3 inches extra on the top edge for gathers or pleats.
-
Elastic Hem – Add casing allowance at the wrist for elastic.
-
Layered Look – Cut a shorter oversleeve over a fitted undersleeve.
-
Detachable Sleeve – Add ties, buttons, or zippers at the armhole edge.
Quick Tips
-
Always make a test sleeve (muslin) first to check fit and adjust ease.
-
Keep the sleeve on grain so it hangs properly.
-
Press seams as you sew to keep the sleeve neat.
11. Wing Ruffle Sleeve
Sleeves with a ruffled edge extending outward like wings.
Cutting Tip: Add extra fabric for ruffle ease.
Mistake: Skimping on gathering stitches leads to uneven ruffles.
Let’s break down how to measure and cut a wing ruffle sleeve step by step. I’ll make it practical, clear, and beginner-friendly.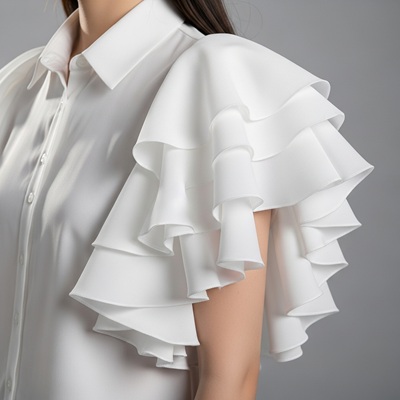
What You’ll Need
-
Measuring tape
-
Pattern paper or tracing paper
-
Pencil or fabric chalk
-
Ruler or French curve
-
Fabric scissors
-
Pins
Step 1: Understand the Wing Ruffle Sleeve
A wing ruffle sleeve is a sleeve with an extended ruffle that often flares out like a wing. It’s a combination of a fitted or semi-fitted sleeve at the armhole and a flared, decorative edge.
-
Key parts:
-
Armhole curve – where the sleeve attaches to the bodice.
-
Sleeve cap – top curved part of the sleeve.
-
Ruffle/wing – the flared portion extending from the sleeve edge.
-
Step 2: Measure for the Sleeve
Take these measurements carefully from the wearer:
-
Armhole circumference – measure around the armhole on the bodice where the sleeve will attach.
-
Upper arm circumference – around the fullest part of the upper arm.
-
Sleeve length – from shoulder seam to desired sleeve end.
-
Ruffle width – how far out you want the ruffle to flare. Usually 6–12 inches depending on style.
-
Ruffle length – optional, if you want the ruffle to drop longer than the sleeve.
Step 3: Draft the Basic Sleeve
-
Draw a vertical line equal to the sleeve length on your paper. This will be the center line.
-
At the top, mark the armhole width divided by 2 on each side. Use a French curve to draw the sleeve cap curve.
-
Draw the sides tapering down according to the upper arm circumference measurement.
Step 4: Add the Ruffle/Wing
-
From the sleeve end, draw a flared shape extending outward to the desired ruffle width.
-
Make the ruffle slightly curved or wing-like; it can be wavy or straight depending on your style.
-
Add seam allowance (usually 0.5–1 inch) around all edges, especially where it will attach to the bodice.
Step 5: Cut the Fabric
-
Lay your pattern on the fabric, pin it down.
-
Cut carefully along the outer lines including seam allowances.
-
If the ruffle is layered, cut multiple pieces as needed.
Step 6: Finishing Tips
-
Always make a muslin sample first to test fit.
-
For a softer ruffle, use lightweight fabrics like chiffon, satin, or organza.
-
If you want a more dramatic wing, increase the ruffle width.
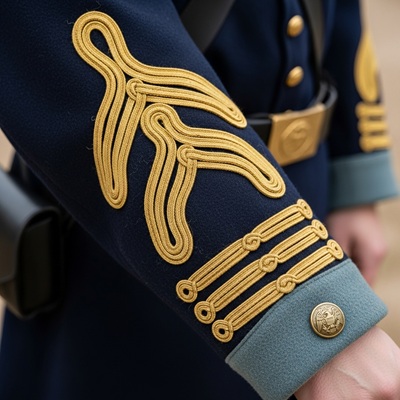
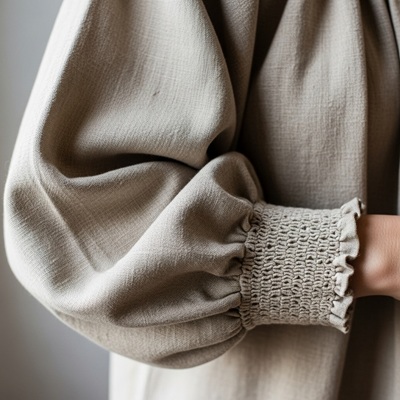
12. Epaulet Sleeve
Decorative shoulder piece integrated into the sleeve.
Sewing Tip: Reinforce with interfacing.
Proportion Tip: Should match shoulder width for symmetry.
Let’s break down how to measure and cut an epaulet sleeve step by step. I’ll explain it clearly as if you’re preparing to sew it yourself.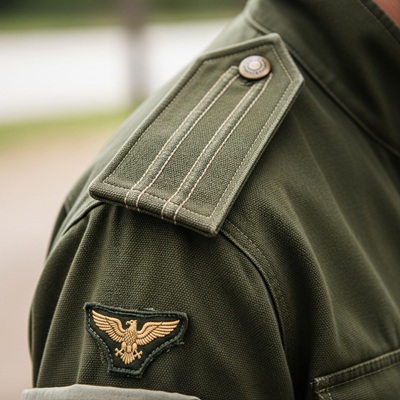 What You Need:
-
Fabric
-
Measuring tape
-
Scissors
-
Chalk or fabric marker
-
Ruler
-
Sewing pins
-
Pattern paper (optional, but helpful)
Step 1: Understanding the Epaulet Sleeve
An epaulet sleeve is a sleeve with an extra strap detail on the shoulder, usually fastened with a button or snap. It often appears on jackets, coats, or military-style shirts. The key parts you need to measure for cutting are:
-
Sleeve – standard sleeve measurements.
-
Epaulet – a rectangular or tapered strap sitting on top of the shoulder.
Step 2: Measure the Sleeve
-
Shoulder Width – measure from shoulder seam to shoulder seam across the back.
-
Arm Length – measure from shoulder seam down to where you want the sleeve to end.
-
Bicep Width – measure around the fullest part of the upper arm.
-
Sleeve Opening – measure the wrist or cuff circumference if it’s a long sleeve.
Tip: Add 1–2 cm for seam allowance.
Step 3: Measure the Epaulet
-
Length – usually 2–3 inches longer than the shoulder seam; it should extend enough to be buttoned on top of the shoulder.
-
Width – typically 2–3 inches wide (can taper slightly at the ends if desired).
-
Button Placement – mark where the button or snap will go; usually near the end that attaches to the shoulder seam.
Tip: If it’s a decorative epaulet, the width can be slightly wider for effect.
Step 4: Draw the Pattern
-
Use pattern paper or mark directly on fabric with chalk.
-
Draw the sleeve according to your measurements, adding seam allowance.
-
Draw the epaulet as a rectangle (or tapered) on separate fabric.
Step 5: Cutting the Fabric
-
Lay your fabric flat.
-
Pin the pattern pieces to the fabric.
-
Cut carefully along the lines, including seam allowances.
-
Don’t forget to cut interfacing for the epaulet if you want it stiff and structured.
Step 6: Preparing to Sew
-
Fold the epaulet in half lengthwise, right sides together.
-
Stitch along the long edge and turn inside out.
-
Press flat with an iron.
-
Position the epaulet on the shoulder, pin, and attach a button or snap.
Quick Tips:
-
Always measure twice, cut once.
-
For thick fabrics (like jackets), add extra seam allowance for bulky seams.
-
Consider making a test epaulet in scrap fabric to check the size.
13. Drawstring Puff Sleeve
Puffed sleeve tightened with a drawstring.
Feature: Adjustable puff height.
Mistakes: Uneven gathering can distort the shape.
Cutting and measuring a drawstring puff sleeve requires precision to achieve the signature gathered, voluminous look. I’ll guide you step by step in a practical, easy-to-follow way.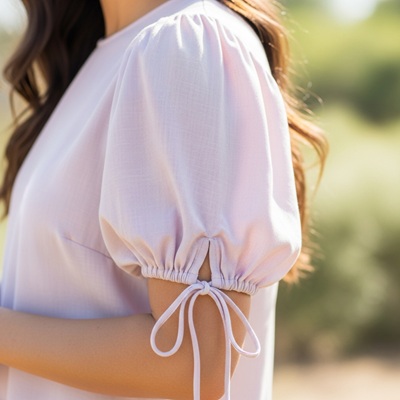
Step 1: Take Accurate Measurements
For a puff sleeve, you need to capture three main measurements:
-
Armhole Circumference – Measure around the armhole of the bodice where the sleeve will attach.
-
Sleeve Length – Decide how long you want the sleeve to be (short, elbow-length, or full-length).
-
Bicep or Upper Arm Circumference – Measure the widest part of the upper arm if the sleeve will be fitted before the puff gathers.
Tip: For a dramatic puff, add 20–30% extra width to your sleeve pattern so that the fabric gathers nicely.
Step 2: Draft the Sleeve Pattern
-
Start with a basic sleeve block (rectangular or tapered, depending on style).
-
Add extra width along the top and bottom edges for gathering.
-
Mark a drawstring casing line at the top of the sleeve and, optionally, at the bottom hem if you want the puff to cinch at the wrist.
Step 3: Cutting the Fabric
-
Fold the fabric if cutting two sleeves at once.
-
Place the sleeve pattern on the fabric, ensuring the grainline runs vertically along the sleeve length.
-
Add seam allowances (usually 1.5 cm or 5/8 inch) around the edges.
-
Cut carefully around the pattern.
Step 4: Prepare for the Drawstring
-
Fold the top edge of the sleeve to create a casing for the drawstring (usually 1–2 cm).
-
Sew the casing, leaving a small opening to insert the drawstring.
-
Repeat for the bottom hem if you want a gathered cuff.
Step 5: Gathering
-
Pull the drawstring slightly to test the gathering and adjust for even fullness.
-
Distribute the gathers evenly along the sleeve.
-
Attach the sleeve to the armhole of the bodice, matching notches and side seams.
Quick Tips
-
For extra puff, use lightweight fabrics like cotton, chiffon, or organza.
-
Always measure twice and cut once.
-
For symmetrical sleeves, cut both sleeves together on folded fabric.
14. Draped Sleeves
Fabric is gracefully draped over the arm.
Sewing Tip: Test folds on muslin before cutting the main fabric.
Cutting and measuring draped sleeves requires careful attention because they are loose, flowing, and often asymmetrical. Here’s a clear, step-by-step guide you can follow:
1. Understand the Draped Sleeve Style
Draped sleeves are often wider and have a soft, flowing appearance. They can be:
-
Batwing or dolman sleeves: wide at the armhole and taper toward the wrist.
-
Cowl draped sleeves: have folds along the length.
-
Cape or waterfall sleeves: hang loosely from the shoulder.
Knowing the type of draped sleeve helps you determine how much extra fabric is needed.
2. Materials and Tools Needed
-
Pattern paper or fabric
-
Measuring tape
-
Ruler or French curve
-
Fabric chalk or pencil
-
Scissors
-
Pins
3. Measuring for Draped Sleeves
Step 1: Shoulder and Armhole
-
Measure the shoulder width from shoulder seam to shoulder seam.
-
Measure the armhole circumference around the fullest part of the upper arm.
-
For draped sleeves, add extra ease (5–10 cm / 2–4 inches) to allow the flowy effect.
Step 2: Sleeve Length
-
Decide where the sleeve will end (wrist, elbow, or mid-arm).
-
Measure from the shoulder seam down to the desired length.
-
For extra drape, add 2–4 inches to the length.
Step 3: Sleeve Width / Draping
-
For a flowing look, measure around the bicep but add considerably more fabric (often double the measurement) to achieve the drape.
-
The width at the hem depends on the style:
-
Cowl sleeves: 1.5–2 times the arm circumference.
-
Batwing/dolman sleeves: widest at the armhole, tapering toward the wrist.
-
4. Drafting the Pattern
-
Draw a basic sleeve block using your measurements.
-
Extend the armhole curve outward for extra volume.
-
Add the desired hem width at the wrist or sleeve end.
-
Shape the sleeve edges to create the drape or fold lines if needed.
-
Use a French curve for smooth, flowing lines.
5. Cutting the Fabric
-
Lay your fabric flat on the cutting surface.
-
Pin the pattern securely.
-
Carefully cut along the pattern lines, adding seam allowances (usually 1–1.5 cm / 0.5 inch).
-
Remember: draped sleeves benefit from extra fabric at the folds.
6. Tips for Perfect Draped Sleeves
-
Fabric choice matters: lightweight, flowy fabrics like chiffon, georgette, satin, or jersey work best.
-
Test with muslin: Make a sample sleeve to check drape and length.
-
Mark folds: If the sleeve has intentional folds or pleats, mark them on the fabric before sewing.
-
Adjust for fit: Draped sleeves are forgiving, but if too wide, reduce the width slightly.
15. Bag Sleeve / Barrel Sleeve
Straight, tubular sleeves, sometimes slightly wide.
Feature: Simplest to sew but requires accurate arm measurements.
Cutting and measuring a bag sleeve or barrel sleeve requires precision because these sleeves are cylindrical or slightly tapered and need to fit properly for bags, jackets, or garments. I’ll break it down step by step in a clear, practical way.
1. Understand the Sleeve Type
-
Bag Sleeve / Barrel Sleeve: A cylindrical sleeve that is generally straight along the arm but can slightly taper towards the wrist.
-
It usually consists of two pieces:
-
Sleeve body (the main tube)
-
Sleeve cap or top (if for garments, the part connecting to the shoulder; for bags, the top seam attaching to the bag body)
-
2. Measure Accurately
You need the following measurements:
-
Length of the Sleeve
-
Measure from the shoulder or attachment point to the desired end of the sleeve.
-
For bags, measure from the seam attachment point to the bottom of the sleeve.
-
-
Circumference of the Arm or Opening
-
Measure around the widest part of the arm (for garments) or the opening of the bag where the sleeve fits.
-
This ensures the sleeve isn’t too tight or loose.
-
-
Sleeve Cap Height (optional for garment sleeves)
-
If your sleeve has a cap, measure from the shoulder point to the underarm.
-
For bag sleeves, skip this unless your sleeve has a decorative top seam.
-
-
Tapering
-
Decide if the sleeve should taper from top to bottom.
-
Measure the bottom opening circumference.
-
3. Draft the Pattern
-
Draw a rectangle:
-
Width: Circumference of the arm or bag opening ÷ 2 + seam allowance (usually 0.5–1 cm per side).
-
Length: Sleeve length + seam allowance at the ends.
-
-
Taper if needed:
-
If the sleeve narrows at the wrist or bag end, draw a slight diagonal from the top width to the bottom width.
-
-
Mark seam allowances:
-
Add at least 0.5–1 cm on all edges for sewing.
-
4. Cutting the Fabric
-
Fold the fabric if you’re cutting two mirrored sleeve pieces.
-
Place the pattern on the fabric and pin it securely.
-
Cut carefully along the pattern outline, including seam allowances.
-
If the fabric is stretchy, consider using a stretch stitch or reinforcing the seam.
5. Tips for Accuracy
-
Use a flexible measuring tape for curved surfaces.
-
Always double-check the circumference measurements against the actual arm or bag opening.
-
If the sleeve is lined, cut an extra piece for lining with the same measurements.
-
For decorative barrel sleeves, you can add pleats or gathers at the top or bottom for a puffed effect.
16. Butterfly Sleeve
Short, flowing sleeves resembling butterfly wings.
Sewing Tip: Finish edges with a rolled hem for a lighter feel.
1. Understanding the Butterfly Sleeve Shape
A butterfly sleeve is:
-
Short to mid-length, often ending around the elbow or mid-arm.
-
Flared and loose, wider at the hem than at the armhole.
-
Curved, not straight like a basic sleeve.
Think of a triangle or petal shape, with the narrowest point at the shoulder seam.
2. Measuring for a Butterfly Sleeve
You’ll need a measuring tape and possibly a drafting paper.
Measurements to Take
-
Armhole Circumference – Measure around the top of the arm where the sleeve will attach to the bodice.
-
Sleeve Length – Measure from the shoulder point down to where you want the sleeve to end.
-
Sleeve Hem Width – Decide how wide you want the sleeve’s bottom. Butterfly sleeves are flared, so this is usually 1.5 to 2 times the armhole width.
-
Shoulder Width (Optional) – Helps in drafting if the sleeve attaches beyond the shoulder seam for a flutter effect.
3. Drafting the Sleeve
-
Draw a vertical line equal to your sleeve length on paper. This is your center line.
-
Mark the armhole width at the top. Draw a horizontal line across the top equal to half the armhole measurement plus seam allowance.
-
Mark the sleeve hem width at the bottom. Draw a horizontal line wider than the top, according to your flare measurement.
-
Connect the top and bottom edges with a gentle curve. Butterfly sleeves look better with a slightly rounded, soft curve, not sharp lines.
-
Add seam allowance (usually 1 cm / 0.5 inch) all around.
4. Cutting the Fabric
-
Fold your fabric if you want symmetrical sleeves. The fold will be along the center of the sleeve.
-
Pin the pattern to the fabric. Make sure the grainline runs vertically.
-
Cut carefully along the outline.
5. Tips
-
Test with muslin first if it’s your first time. This helps adjust flare and length.
-
Flare proportion: Too much can look like a cape; too little may lose the butterfly effect.
-
Hemming: A rolled hem or narrow hem works best to keep the flutter light and airy.
17. Dalmatian Sleeves
Spotted or patterned puff sleeves inspired by Dalmatian prints.
Proportion Tip: Balance prints with sleeve fullness.
practical guide on how to cut and measure Dalmatian sleeves, step by step — perfect if you’re learning garment construction or simply trying to create that stylish, speckled puff sleeve look.
What Are Dalmatian Sleeves?
“Dalmatian sleeves” usually refer to puff or balloon sleeves made using Dalmatian print fabric (white with black spots). The term may also describe sleeves with a soft gathered or rounded puff effect, commonly seen on blouses and dresses.
Whether you’re working with printed fabric or simply aiming for that puffed silhouette, the cutting and measuring process follows a similar approach.
Tools and Materials You’ll Need
-
Measuring tape
-
Ruler or French curve
-
Fabric scissors
-
Tailor’s chalk or fabric marker
-
Pattern paper (optional)
-
Fabric (Dalmatian print if available)
-
Pins and thread
-
Elastic or bias tape (for gathers, if needed)
Step 1: Take Accurate Body Measurements
Before drafting or cutting, measure carefully:
-
Armhole circumference – around the top of the shoulder and underarm.
-
Sleeve length – from the shoulder point down to where you want the sleeve to end.
-
Bicep circumference – around the fullest part of the upper arm.
-
Wrist or cuff circumference – if the sleeve tapers or ends with elastic.
-
Ease allowance – add 2 to 3 inches to create puff or gather volume.
Step 2: Draft the Basic Sleeve Block
-
Draw a vertical line equal to your sleeve length.
-
Draw a horizontal line at the top for the bicep width (½ of bicep measurement + ease).
-
Shape the sleeve cap (curved top) using a French curve — higher if you want more puff.
-
For a Dalmatian sleeve, extend the sleeve cap upward by 1.5–3 inches to create fullness.
-
Smooth the curve — this extra height forms the puff or gathered section at the shoulder.
Step 3: Add Volume for the Dalmatian Style
To get the distinctive puff look:
-
Slash and spread method:
-
Cut the paper pattern vertically from hem to sleeve cap in 3–4 places (don’t cut through the top).
-
Spread each section 1–2 inches apart.
-
Tape them onto another sheet, keeping the top curve smooth.
-
-
The more you spread, the fuller your puff becomes.
-
Add seam allowances (½ inch on all edges).
Step 4: Cut the Fabric
-
Fold your fabric right sides together.
-
Pin the paper pattern and trace it using tailor’s chalk.
-
Carefully cut along the marked lines.
-
If you want symmetry, cut both sleeves at once.
Tip: Use sharp scissors and avoid shifting the fabric, especially if it’s slippery satin or chiffon.
Step 5: Gather and Assemble the Sleeve
-
Sew two parallel gathering stitches along the sleeve cap edge (the top).
-
Gently pull the threads to create gathers that fit into your armhole.
-
Sew the underarm seam of the sleeve.
-
Attach the sleeve to the garment body, matching notches and easing the gathers evenly.
-
Finish the bottom with a cuff, elastic, or a narrow hem, depending on your design.
Bonus Tips
-
For a dramatic puff, use lightweight fabrics like organza, voile, or chiffon.
-
For subtle fullness, try cotton or poplin.
-
Always press seams gently for a professional finish.
-
Use Dalmatian print fabric for a bold, trendy statement.
Quick Reference Measurements
| Measurement | Formula | Notes |
|---|---|---|
| Sleeve Length | Shoulder to wrist | Add 1 inch for hemming |
| Bicep Width | (Bicep ÷ 2) + 2–3 in | For ease |
| Armhole | Same as bodice armhole | Should match exactly |
| Cap Height | 4–6 in | Add more for puff effect |
| Hem Width | Desired width + 1 in | Add extra for seam |
18. Marmaluke / Virago Sleeve
Historically inspired, voluminous, often pleated.
Feature: Eye-catching statement sleeve.
A Marmaluke/Virago sleeve is a dramatic, often wide, medieval-style sleeve that flares from the shoulder or upper arm and can have pointed ends or hanging panels. It’s common in costume-making or period-inspired fashion. Cutting and measuring it requires careful planning. Here’s a clear guide: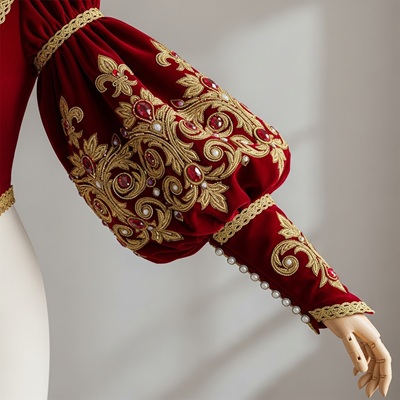
Step 1: Take Accurate Body Measurements
You’ll need these measurements first:
-
Shoulder Width – From one shoulder seam to the other.
-
Upper Arm Circumference – Around the widest part of your upper arm.
-
Bicep to Wrist Length – Distance from the upper arm to the wrist (or desired sleeve length).
-
Desired Flare Width – How wide you want the sleeve opening at the wrist or the hanging tip.
-
Armhole Depth – Usually from the shoulder seam down to under the arm (for pattern drafting).
Step 2: Draft the Sleeve Pattern
-
Basic Sleeve Shape:
-
Start with a rectangle: the length = shoulder to wrist + seam allowance.
-
The width = upper arm circumference + ease + extra flare for the Marmaluke style.
-
-
Flare and Panel Shape:
-
Draw a line from the underarm or elbow to the wrist, expanding outward to create a bell or triangular shape.
-
If it has pointed tips or hanging panels, extend the rectangle into triangles at the ends.
-
-
Add Seam Allowances:
-
Usually 1–1.5 cm around the edges for sewing.
-
If using a hemmed edge on the flared part, add an extra 2–3 cm for hemming.
-
Step 3: Cut the Fabric
-
Fold the fabric lengthwise if you want symmetrical sleeves.
-
Lay the pattern on the fabric. Pin it securely.
-
Use sharp fabric scissors to cut along the edges. Be precise with flare edges and points.
Step 4: Mark Important Points
-
Use chalk or fabric markers to indicate:
-
Shoulder seam placement
-
Underarm seam
-
Pointed ends or hanging panels
-
Fold lines for hems
-
Step 5: Sewing Considerations
-
Marmaluke sleeves are usually wide at the bottom, so lightweight fabric helps it drape beautifully.
-
Consider reinforcing the shoulder seam since the fabric weight can pull the garment.
-
Hemming the flared edges neatly ensures the sleeve hangs properly.
Tips:
-
Test the pattern first with muslin to check the fit and flare.
-
For historically accurate styles, the sleeve can be open along the underarm or outer arm, connected only at the shoulder.
-
You can also add lining if the fabric is sheer or heavy.
19. Petal Sleeve (Lapped Sleeve)
Overlapping, curved fabric panels resembling petals.
Sewing Tip: Align layers carefully for a smooth finish.
What is a Petal (Lapped) Sleeve?
A Petal Sleeve is a style where two overlapping layers form a “petal” shape at the shoulder or arm, often giving a soft, flowing, and feminine look. Sometimes it’s called a lapped sleeve because one layer laps over the other.
The sleeve may be full-length, short, or mid-length, and often requires precise cutting to ensure the overlapping pieces sit correctly.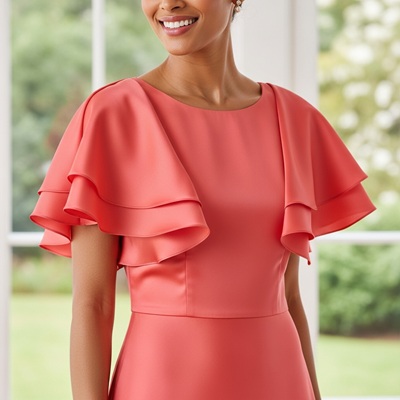
Step 1: Take Accurate Measurements
Before cutting, you need these measurements:
-
Shoulder Width – From shoulder tip to shoulder tip.
-
Armhole Circumference (Armhole Depth) – Around the arm at the shoulder.
-
Upper Arm Circumference – Around the fullest part of the upper arm.
-
Sleeve Length – From the shoulder tip to the desired sleeve end.
-
Petal Overlap – How much one layer will lap over the other (usually 1–3 inches, depending on style).
Step 2: Draft the Sleeve Pattern
If you’re drafting from scratch:
-
Draw a basic sleeve block
-
Use your measurements to create a standard sleeve outline.
-
The top curve is the sleeve cap, which fits into the armhole.
-
-
Divide the Sleeve for Petals
-
Draw a slanted line or curved line from the sleeve cap to the hem. This line separates the front petal and back petal.
-
Typically, the front petal is slightly longer and overlaps the back petal.
-
-
Add Seam Allowances
-
Add 1–1.5 cm (½ inch) around all edges for sewing.
-
Remember extra allowance for the overlap section.
-
Step 3: Cut the Fabric
-
Fold the fabric if you need symmetrical petals.
-
Pin the pattern pieces on the fabric.
-
Cut carefully along the lines, ensuring you cut two separate petals (or more, depending on design).
-
Mark notches to match up overlapping sections later.
Tip: Use sharp fabric scissors to avoid fraying, especially if using delicate fabrics.
Step 4: Measure During Fitting
-
Check the overlap at the shoulder – Make sure the petals overlap evenly and comfortably.
-
Check the arm circumference – Ensure it’s not too tight once the petals are sewn.
-
Adjust length if needed – The petals may drape differently depending on fabric, so measure from shoulder to hem after initial draping.
Step 5: Sewing the Petal Sleeve
-
Align the shoulder seams of the petals with the garment body.
-
Pin the overlap where the petals meet.
-
Baste and try on – Ensure the drape and overlap are correct.
-
Sew along the seam line and finish edges with a serger or zigzag stitch.
Quick Tips
-
Lightweight or flowy fabrics (cotton voile, chiffon) work best for a soft petal effect.
-
Make a muslin mock-up first to test the overlap and drape.
-
Mark the overlap line clearly on the pattern so you don’t confuse front/back petals.
-
You can slightly curve the hem of each petal for a more natural “petal” look.
20. Padded Shoulder Sleeve
Includes padding for a structured silhouette.
Sewing Tip: Use lightweight padding to avoid bulkiness.
Here’s a clear, step-by-step guide on how to cut and measure a padded shoulder sleeve. I’ll keep it practical, simple, and easy to follow for anyone, whether you’re a beginner or intermediate in sewing.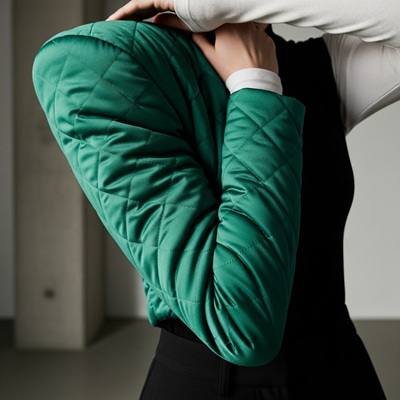
Tools You’ll Need
Measuring tape
Fabric chalk or marker
Ruler or French curve (for smooth sleeve lines)
Shoulder pads (pre-made or DIY)
Scissors or rotary cutter
Pattern paper (optional, if drafting a sleeve)
Step 1: Take Accurate Body Measurements
Before cutting, you need precise measurements:
Shoulder Width – Measure from the tip of one shoulder to the other.
Armhole Circumference – Measure around the shoulder where the sleeve will attach.
Upper Arm Circumference – Measure the widest part of your upper arm.
Sleeve Length – Measure from shoulder seam down to your desired sleeve end (wrist, elbow, or mid-arm).
Tip: Add ease (about 1–2 cm) for comfort, especially when using padding.
Step 2: Draft or Choose a Sleeve Pattern
If you have a sleeve pattern:
Make sure it matches your armhole measurement.
Add extra width at the shoulder area for padding.
If you’re drafting your own sleeve:
Draw a vertical line equal to the sleeve length.
At the top, mark the armhole width plus ease.
Use a French curve to shape the sleeve cap so it fits into the armhole smoothly.
The sleeve cap needs to be slightly taller if you’re adding shoulder pads.
Step 3: Add Shoulder Pad Placement
Decide the pad size: Small, medium, or large.
Mark the area on the sleeve where the pad will sit. Usually, the pad extends from the shoulder seam slightly outward.
Increase the sleeve cap height by 0.5–1 cm to accommodate the pad.
Ensure the sleeve width at the shoulder includes extra fabric to avoid tightness after inserting the pad.
Step 4: Cut the Fabric
Lay your fabric flat and pin your pattern on it.
Double-check the shoulder pad placement markings.
Cut carefully along the pattern, making smooth lines.
Tip: If your fabric is slippery, use weights or pins to prevent shifting.
Step 5: Attach the Shoulder Pads
There are two options:
Sew-in Pads: Place the pad inside the sleeve, aligning it with your shoulder seam. Sew along the edges to secure.
Removable Pads: Make a small pocket inside the sleeve to insert the pad. This makes it easier to remove for washing.
Ensure the sleeve maintains a natural curve without puffing too much.
Step 6: Fit Test
Temporarily baste the sleeve into the garment.
Try it on to check shoulder shape and arm mobility.
Adjust the sleeve or pad if it looks too bulky or restrictive.
Extra Tips
Fabric Choice: Thick fabrics need slightly bigger pads; thin fabrics need smaller pads.
Seam Allowance: Include at least 1–1.5 cm around the sleeve edges.
Symmetry: Always cut sleeves in pairs to ensure matching shoulder shapes.
21. Dolman / Magyar Sleeve
Wide at the armhole, narrow at the wrist.
Cutting Tip: Extra fabric at the shoulder for drape.
Mistake: Too tight at the wrist restricts movement.
Cutting and measuring a Dolman (or Magyar) sleeve can seem tricky at first because it’s a wide, flowing sleeve that is part of the bodice rather than a traditional set-in sleeve. But once you understand the steps, it becomes quite manageable. Here’s a clear, step-by-step guide:
Step 1: Understand the Dolman Sleeve Structure
A Dolman sleeve is:
-
Wide at the armhole and tapers toward the wrist.
-
Often cut as part of the bodice, meaning there’s little or no separate sleeve seam.
-
Sometimes called a batwing sleeve because of its shape.
Key measurement points:
-
Shoulder seam (if any)
-
Bust or chest width
-
Sleeve length from armhole to wrist
-
Wrist or cuff width
Step 2: Take Body Measurements
You’ll need the following measurements:
-
Bust/Chest circumference – the widest part of the torso.
-
Waist circumference – optional, if the sleeve is fitted at the waist.
-
Armhole depth – usually 1/4 of the bust measurement plus 1–2 inches for ease.
-
Sleeve length – from the base of the neck or shoulder to the wrist (depending on style).
-
Wrist circumference – where the sleeve will end.
-
Shoulder to bust length – optional, helps shape the sleeve at the top.
Step 3: Draft the Pattern
-
Draw a vertical center line for the bodice front/back.
-
Mark the armhole depth along the line.
-
Draw the top shoulder curve (if any). Dolman sleeves often have a diagonal slope from the neckline to the underarm.
-
Draw the sleeve outline:
-
Start wide at the armhole (this will match the armhole measurement plus ease).
-
Taper gradually to the wrist width.
-
Tip: Add 1–2 inches of ease at the bust and upper arm for comfort.
Step 4: Measure and Cut Fabric
-
Fold fabric if you want symmetrical sleeves.
-
Place your pattern on the fabric. Ensure grainline matches the body’s grainline.
-
Trace the outline with chalk or fabric marker.
-
Add seam allowances (usually ½ to 1 inch).
-
Cut carefully.
Step 5: Check the Fit
-
Before sewing the final garment, make a muslin test.
-
Ensure the armhole is comfortable and the sleeve length is correct.
-
Adjust tapering if needed.
Tips for Dolman Sleeves
-
Dolman sleeves allow a lot of movement, so don’t cut too tight at the armhole.
-
Use lightweight fabrics for drapey effects; thick fabrics may look bulky.
-
If adding cuffs, measure wrist circumference and allow extra ease for comfort.
22. Square Armhole Sleeve
Classic, fitted sleeve with straight seams.
Sewing Tip: Precise measurement is essential for a clean look.
23. Peasant Sleeve
Gathered at the shoulder and wrist, often flowing.
Proportion Tip: Keep wrist hem elastic or drawstring for adjustability.
What You’ll Need:
-
Measuring tape
-
Fabric of your choice
-
Scissors or rotary cutter
-
Pins or fabric weights
-
Pencil, fabric chalk, or erasable marker
-
Ruler or French curve (optional)
Step 1: Take Your Measurements
A peasant sleeve is usually loose, gathered at the shoulder and cuff, creating a soft, billowy look. You need the following measurements:
-
Arm Length: Measure from the shoulder seam to where you want the sleeve to end (wrist or mid-arm for 3/4 sleeves).
-
Bicep Circumference: Measure the fullest part of your upper arm and add extra for gathering (usually 4–6 inches extra).
-
Cuff Circumference: Measure around your wrist or the desired end of the sleeve. Add extra for elastic or gathering (usually 1–2 inches).
-
Shoulder to Shoulder (Optional): Helps if the sleeve will be set-in or slightly dropped.
Step 2: Draft the Sleeve Pattern
-
Draw a Rectangle:
-
Width = Bicep Circumference + extra for gathers
-
Length = Arm Length + seam allowance (1 inch for hem and 1/2 inch for seam)
-
-
Shape the Sleeve Cap (Optional for set-in sleeves):
-
For a traditional peasant sleeve, the sleeve cap is often soft and rounded. You can curve the top edge slightly with a French curve or by hand.
-
-
Mark Cuff Placement:
-
Draw a line at the bottom of the rectangle for where the elastic or cuff will be.
-
Step 3: Add Seam Allowances
-
Add 1/2 inch to all sides for sewing seams.
-
Add 1 inch at the bottom if you are folding over for a cuff or elastic casing.
Step 4: Cut the Fabric
-
Lay your fabric flat.
-
Place your pattern on the fabric and pin it down or use weights.
-
Cut carefully along the outline.
Tip: Cut two identical pieces for each sleeve if you’re making a set-in sleeve.
Step 5: Sew the Sleeve (Optional Step)
-
Gather the top of the sleeve to fit your shoulder seam.
-
Sew the side seam.
-
Create a casing at the cuff and insert elastic, or finish with a hem if desired.
Quick Tips:
-
Peasant sleeves are meant to be loose and flowing, so err on the side of more fabric rather than less.
-
Using lightweight fabrics like cotton, linen, or chiffon works best.
-
For a boho or romantic look, gather generously at the shoulder and cuff.
24. Pagoda Sleeve
Flares dramatically from the elbow to the wrist.
Sewing Tip: Ensure the flare is symmetrical on both sides.
What You Need
-
Measuring tape
-
Pattern paper or fabric
-
Pencil or fabric chalk
-
Ruler
-
Scissors
-
Pins
Step 1: Take Your Measurements
Before cutting, you need accurate measurements. For a pagoda sleeve, the key measurements are:
-
Shoulder Width: From one shoulder seam to the other.
-
Armhole Depth: From the top of the shoulder down to the armpit.
-
Sleeve Length: From the shoulder point down to where you want the sleeve to end. Pagoda sleeves are usually long and flare out at the wrist or mid-arm.
-
Flare Width: How wide you want the sleeve at the hem. Pagoda sleeves are narrow at the top and wide at the bottom.
-
Bicep Circumference (optional): Helps ensure the sleeve is comfortable around the upper arm.
Step 2: Draw the Sleeve Pattern
-
On pattern paper, draw a vertical line equal to the sleeve length. This is the center line of the sleeve.
-
At the top, mark the armhole width. You can use your armhole measurement divided by 2 plus some ease.
-
Draw the bicep line about 5–10 cm down from the top (depending on your arm shape).
-
Draw the flare line at the bottom of the sleeve where you want it to widen.
Tip: Pagoda sleeves flare dramatically, so the bottom width can be 1.5 to 3 times the bicep width.
Step 3: Shape the Sleeve
-
Connect the top of the sleeve (shoulder/armhole) to the flare line at the bottom with a smooth, curved line.
-
Make sure the curve looks natural—it should be narrow at the top, gradually widening toward the bottom.
-
Add seam allowances (usually 1–1.5 cm) around the edges for sewing.
Step 4: Cut the Fabric
-
Place the pattern on your fabric. Pin it down securely.
-
Cut carefully along the outline, including the seam allowance.
-
If your fabric has a directional pattern, make sure it’s aligned correctly before cutting.
Step 5: Test and Adjust
-
You can make a muslin (test version) first to check the fit.
-
Make adjustments to the flare or armhole if needed before cutting the final fabric.
Extra Tips
-
Pagoda sleeves look best on lightweight or medium-weight fabrics that drape well.
-
If the sleeve is very wide at the bottom, you may want to add a 2–3 cm hem allowance for finishing.
-
Always cut two sleeves (left and right) and make sure the pattern is mirrored for symmetry.
25. Frill / Flute Sleeves
Decorative, ruffled edge.
Feature: Adds femininity and elegance.
What You Need
-
Measuring tape
-
Pencil or fabric marker
-
Ruler or French curve
-
Scissors
-
Sleeve pattern (optional)
-
Fabric
Step 1: Take the Sleeve Measurements
Before cutting, you need accurate measurements. A frill or flute sleeve is fitted at the shoulder and upper arm, then flares out with a ruffle. Measure carefully:
-
Shoulder Width: From one shoulder seam to the other.
-
Armhole Circumference: Around the fullest part of your upper arm where the sleeve will attach.
-
Sleeve Length: From the shoulder seam to the desired sleeve end.
-
Frill Length: How far you want the flare to extend beyond the normal sleeve hem.
-
Flare Width: How wide you want the frill at the bottom. Usually, frills are 1.5–2 times the width of the sleeve hem for a nice flare.
Step 2: Draft the Sleeve Pattern
If you’re using a pattern, skip this step. If not, you can draft one:
-
Draw a vertical line for sleeve length.
-
Draw a horizontal line at the top for armhole width (half the armhole measurement if folding fabric).
-
Shape the sleeve from shoulder to wrist using a straight or slightly curved line.
-
For the frill:
-
Draw a trapezoid or semi-circle at the sleeve hem, depending on the frill style.
-
The top of the frill connects to the sleeve hem.
-
The bottom is the width of the frill (wider than the sleeve hem).
-
Step 3: Cut the Fabric
-
Fold your fabric if you want symmetrical sleeves.
-
Place the pattern on the fabric and pin it.
-
Leave 1–1.5 cm seam allowance around all edges.
-
Cut carefully following the pattern lines.
Step 4: Add Gathering (Optional)
Frill sleeves often have gathers at the attachment point:
-
Use a long basting stitch along the top edge of the frill.
-
Pull the threads gently to create even gathers until it matches the sleeve hem width.
-
Pin the gathered frill to the sleeve and sew.
Tips for Perfect Frill Sleeves
-
Fabric choice matters: Lightweight fabrics like chiffon, organza, or cotton drape beautifully.
-
Even flare: Make sure the frill width is consistent for a balanced look.
-
Test on scrap fabric: Especially for wide or layered frills.
-
Mark clearly: Use fabric chalk to outline flares and gathers before cutting.
26.Cape / Circular Sleeve
Circular cut drapes like a cape over the arm.
Sewing Tip: Fabric choice affects how fluidly it hangs.
Step 1: Gather Your Materials
You will need:
-
Fabric (light to medium weight works best for capes/circular sleeves)
-
Measuring tape
-
Ruler or French curve
-
Tailor’s chalk or fabric marker
-
Scissors
-
Pins
Step 2: Take Your Measurements
For a cape or circular sleeve, the key measurements are:
-
Neck circumference – Measure around the base of your neck.
-
Shoulder to desired length – Decide how long you want the cape or sleeve to fall. For a sleeve, measure from the shoulder to where you want it to end.
-
Armhole (optional for fitted sleeves) – If you want a slightly fitted sleeve, measure around the fullest part of your upper arm.
Step 3: Determine Your Circle Radius
A circular sleeve or cape is essentially a part of a circle. Here’s how to calculate the radius:
-
Radius for Neck Opening:
Use the formula:Radius=Neck Circumference2πRadius = \frac{\text{Neck Circumference}}{2 \pi}
For example, if the neck circumference is 40 cm:
Radius=402×3.1416≈6.37 cmRadius = \frac{40}{2 \times 3.1416} \approx 6.37 \, \text{cm}
-
Radius for Outer Edge:
Add the desired length of the cape/sleeve to the inner radius.Outer Radius=Inner Radius+LengthOuter\,Radius = Inner\,Radius + Length
Example: If you want a 60 cm long cape:
Outer Radius=6.37+60≈66.37 cmOuter\,Radius = 6.37 + 60 \approx 66.37 \, \text{cm}
Step 4: Draft the Pattern
-
Fold your fabric in half twice to create a quarter circle. This way, when you cut, you get a full circle.
-
From the folded corner (the center), measure and mark the inner radius (neck opening).
-
Measure and mark the outer radius (hemline).
-
Draw smooth curves connecting the marks using a French curve or freehand.
Step 5: Cut the Fabric
-
Pin your pattern to the fabric if needed.
-
Carefully cut along the outer curve.
-
Cut the inner circle for the neck opening.
Tip: Cut a slightly larger neck opening first; you can always adjust after trying it on.
Step 6: Finishing
-
Hem the outer edge using a narrow hem or bias tape to prevent fraying.
-
Finish the neck edge with a facing, collar, or binding.
Extra Tips
-
For longer capes, add extra fabric for fullness.
-
For sleeves, make the inner radius slightly smaller than the armhole for a snug fit.
-
Always prewash your fabric to avoid shrinkage after cutting.
27. Juliet Sleeve
What is a Juliet Sleeve?
A Juliet sleeve is a romantic, puffed sleeve style popular in historical and vintage-inspired fashion. It is tight at the lower arm and puffed at the shoulder, creating a dramatic, elegant look. Sometimes, it has a fitted lower sleeve with gathers or pleats at the shoulder.
Tools You’ll Need
-
Measuring tape
-
Fabric scissors
-
Pencil or fabric chalk
-
Ruler or French curve
-
Pins
-
Pattern paper (optional)
Step 1: Take Accurate Measurements
You need the following measurements to draft a Juliet sleeve pattern:
-
Shoulder to wrist – from the top of your shoulder to your wrist.
-
Upper arm circumference – measure around the fullest part of your upper arm.
-
Wrist circumference – measure around your wrist for the fitted part.
-
Bicep height (optional) – from shoulder to the point where the puff will taper into the fitted lower sleeve.
-
Sleeve cap height – usually 10–12% of the upper arm circumference; this helps determine the puff volume.
Step 2: Draft the Sleeve Pattern
-
On pattern paper, draw a vertical line equal to your shoulder-to-wrist measurement. This is the center line of the sleeve.
-
At the top, mark the bicep width plus extra for gathering/puff (usually 2–4 inches more than the actual measurement).
-
Draw a slightly curved line down to the wrist width, creating the tapered shape of the sleeve.
-
Mark the sleeve cap curve for attaching to the armhole; it should be rounded for the puffed effect.
Tip: Use a French curve to smooth the curves, especially at the cap.
Step 3: Cut the Fabric
-
Fold the fabric if cutting double layers.
-
Pin the pattern onto the fabric carefully.
-
Add a seam allowance (usually 1 cm for seams and 2–3 cm for hems).
-
Cut along the edges carefully, keeping the curves smooth.
Step 4: Prepare the Puff
-
Gather the top edge of the sleeve (the sleeve cap) using basting stitches.
-
Pull the threads gently until the sleeve fits the armhole without stretching.
-
Distribute the gathers evenly to create a balanced puff.
Step 5: Sew the Lower Sleeve
-
Sew the side seams of the sleeve from the puffed area down to the wrist.
-
If the sleeve is fitted at the wrist, consider adding a small hem or elastic casing for a snug finish.
Extra Tips
-
Always make a muslin sample first to test the fit of your puff.
-
For a more dramatic Juliet sleeve, increase the gathers at the shoulder.
-
Check that the sleeve cap matches your armhole measurement before sewing.
Tight at the upper arm, puffed at the shoulder.
Sewing Tip: Gather the shoulder carefully for a smooth puff.
28. Man’s Shirt Sleeve with Cuff
Materials Needed
-
Fabric for the shirt
-
Measuring tape
-
Tailor’s chalk or fabric marker
-
Ruler
-
Scissors
-
Pins
-
Sewing machine or needle and thread
-
Interfacing (for the cuff)
Step 1: Measure the Sleeve
Accurate measurements are crucial. Use a measuring tape and note them down.
-
Shoulder to Wrist Length:
Measure from the shoulder seam to the wrist bone. This is the total sleeve length. -
Bicep Circumference:
Measure around the fullest part of the upper arm. Add 1–2 inches for ease. -
Elbow Circumference:
Measure around the elbow for a comfortable fit, adding ease (around 1 inch). -
Wrist Circumference:
Measure around the wrist where the cuff will sit. Add 0.5–1 inch for comfort and seam allowance.
Step 2: Draft the Sleeve Pattern
-
Draw a straight line on paper equal to the shoulder-to-wrist length.
-
Mark points for bicep, elbow, and wrist width according to your measurements.
-
Connect these points with a slight curve to create the natural shape of the sleeve.
-
The sleeve should be slightly wider at the top and taper down toward the wrist.
-
Step 3: Cut the Fabric
-
Fold the fabric in half lengthwise if cutting two sleeves at once.
-
Place your pattern on the fabric, pin it, and trace with chalk.
-
Add seam allowance (usually 0.5–1 inch) around the edges.
-
Cut the fabric carefully along the traced lines.
Step 4: Prepare the Cuff
-
Cut a rectangle for the cuff:
-
Length: wrist circumference + 1–2 cm for overlap
-
Width: 2–3 inches (depends on how wide you want the cuff) + seam allowance
-
-
Cut a piece of interfacing slightly smaller than the cuff to give it stiffness.
-
Iron the interfacing onto the wrong side of the cuff fabric.
Step 5: Attach the Cuff to the Sleeve
-
Fold the cuff in half lengthwise, wrong sides together, and press.
-
Open the fold and pin the raw edge of the cuff to the sleeve’s wrist edge, right sides together.
-
Sew along the pinned edge.
-
Fold the cuff over and topstitch or finish the seam inside neatly.
Step 6: Finish the Sleeve
-
Sew the underarm seam of the sleeve if not done already.
-
Press all seams neatly.
-
The sleeve is now ready to be attached to the shirt body.
Tips for Accuracy
-
Always add ease for comfort—tight sleeves look restrictive.
-
Measure twice before cutting; fabric mistakes are hard to fix.
-
Press seams as you go for a professional finish.
Classic straight sleeve ending in a cuff.
Sewing Tip: Press cuff seams well; topstitching adds professionalism.
29. Bracelet Sleeve (Three-Fourths Sleeve)
Sleeve length between the elbow and wrist.
Feature: Practical, stylish, easy to pair with accessories.
How to Cut and Measure a Bracelet Sleeve
A bracelet sleeve is a sleeve that ends just above the wrist bone, allowing bracelets or watches to show slightly. It’s stylish, comfortable, and works beautifully for blouses, dresses, and jackets. To achieve a neat fit, accuracy in measuring and cutting is key.
1. Understand the Bracelet Sleeve Length
Before you start, it helps to know how long a bracelet sleeve should be.
-
It usually ends 1 to 2 inches above the wrist bone.
-
It’s longer than a three-quarter sleeve but shorter than a full-length sleeve.
This length gives a balanced look that’s both elegant and practical.
2. Tools You’ll Need
Gather the following before cutting:
-
Measuring tape
-
Fabric scissors
-
Tailor’s chalk or marking pencil
-
Straight ruler or French curve
-
Pattern paper (if you’re drafting a sleeve pattern)
-
Pins
3. Measuring Your Arm for the Sleeve
Use a flexible tape measure and keep your arm slightly bent for comfort.
-
Armhole depth (bicep area): Measure around the fullest part of your upper arm. Add 1 inch for ease.
-
Sleeve length: Measure from the shoulder tip to about 1–2 inches above your wrist. That’s your bracelet sleeve length.
-
Wrist circumference: Measure around your wrist, then subtract 1 inch for the shorter sleeve finish (you can add ease if you prefer a looser fit).
Tip: Always take measurements over the same type of clothing you’ll wear underneath (especially if it’s a jacket or blazer).
4. Drafting or Adjusting the Sleeve Pattern
If you already have a basic long-sleeve pattern, you can easily adjust it to bracelet length.
-
Lay your sleeve pattern flat on the table.
-
Measure from the sleeve cap (top edge) down to your desired bracelet sleeve length.
-
Mark the new length with tailor’s chalk.
-
Draw a straight line across the sleeve at that point — this becomes your new sleeve hem.
-
Add hem allowance (usually 1 inch for turning and stitching).
If you’re drafting from scratch, use your arm measurements to shape the sleeve width at the bicep, elbow, and wrist, then connect the lines smoothly.
5. Cutting the Sleeve
-
Place your fabric on the table, folded right sides together.
-
Pin the sleeve pattern securely to the fabric.
-
Cut carefully along the pattern edges, following the new bracelet-length line.
-
Mark the grainline and notches (these help you match the sleeve to the armhole correctly).
6. Finishing the Hem
Once sewn, finish the sleeve edge neatly:
-
Fold the hem allowance to the inside and press.
-
Fold again (¼ inch) for a clean finish.
-
Stitch close to the folded edge.
-
Press again for a crisp look.
Optional: You can add a small slit or button detail at the cuff for a dressier style.
7. Fitting and Adjustments
Try the sleeve on before final stitching:
-
Make sure it sits just above your wrist bone.
-
Move your arms — it should be comfortable and not too tight around the elbow or wrist.
-
If it feels short after hemming, you can add a small cuff or lace trim to extend the length slightly.
Quick Summary
| Step | Action | Tip |
|---|---|---|
| 1 | Measure from shoulder to just above wrist | Keep arm slightly bent |
| 2 | Mark new length on sleeve pattern | Add 1 inch hem allowance |
| 3 | Cut along the new line | Pin fabric before cutting |
| 4 | Sew and finish the hem | Press for neatness |
Final Tip
A bracelet sleeve looks best when it slims gently toward the wrist — not too wide or baggy. Pair it with bracelets or watches to highlight your wrist and add elegance to your outfit.
30. Extended Cap Sleeves
Small sleeve extending slightly beyond the shoulder.
Sewing Tip: Often used on formal dresses for a subtle shoulder accent.
How to Cut and Measure Extended Cap Sleeves
Extended cap sleeves are short sleeves that slightly extend beyond the shoulder without a visible armhole seam. They give a smooth, continuous shoulder line—perfect for blouses, dresses, and tops that need a soft, feminine look.
What You’ll Need
-
Measuring tape
-
Pattern paper or fabric
-
Tailor’s chalk or pencil
-
Ruler or French curve
-
Scissors
-
Basic bodice pattern (front and back)
Step 1: Take Accurate Measurements
You’ll use your bodice measurements to determine the sleeve extension.
-
Shoulder Width: Measure from one shoulder tip to the other.
-
Armhole Depth: From the top of the shoulder down to the underarm level.
-
Desired Sleeve Length: Decide how far you want the sleeve to extend from the shoulder (usually 2–4 inches).
-
Bicep Circumference (optional): Useful if the sleeve is slightly longer.
Step 2: Prepare the Bodice Pattern
You’ll work directly from your basic bodice block.
-
Place the front and back bodice pattern pieces side by side at the shoulder line, matching shoulder seams.
-
Tape them together so they form a continuous shoulder line.
-
Smooth out the armhole curve using a French curve to create a natural flow.
Step 3: Extend the Shoulder Line
-
From the end of the shoulder line, extend outward by the amount you want the sleeve to cover the arm — usually 2 to 4 inches.
-
Mark this point; it becomes the outer edge of the sleeve.
-
From that point, draw a gentle curve downward to meet the side seam line — this creates the sleeve’s lower edge.
Step 4: Shape the Sleeve Edge
To create a nice, natural look:
-
Curve slightly downward toward the underarm for a soft drop.
-
Avoid making it too straight — that can make the sleeve stiff.
-
For a rolled or folded hem, add ½ inch (1.2 cm) seam allowance along the sleeve edge.
Step 5: Add Seam Allowances
Don’t forget to add:
-
½ inch (1.2 cm) seam allowance on the shoulder and armhole areas.
-
1 inch (2.5 cm) hem allowance if you plan to turn the edge under twice.
Step 6: Cut the Fabric
-
Place the pattern on the fabric on fold (especially for the front and back pieces).
-
Cut carefully along your marked lines.
-
Mark notches at the shoulder points to ensure proper alignment during sewing.
Step 7: Assemble and Test Fit
-
Sew the shoulder seams together.
-
Try the garment on to check how the sleeve drapes.
-
Adjust the curve or width of the extension if needed.
Pro Tips
-
Use light to medium-weight fabric like cotton or crepe for a graceful fall.
-
To make the sleeve stand out, add facing along the armhole and sleeve edge.
-
If you want more coverage, extend the sleeve length slightly and shape it into a mini flutter.
Summary
| Measurement | Purpose | Average Range |
|---|---|---|
| Shoulder width | Base for extension | — |
| Sleeve extension | Controls sleeve length | 2–4 in (5–10 cm) |
| Seam allowance | Finishing edges | ½ in (1.2 cm) |
| Hem allowance | Turned edge | 1 in (2.5 cm) |
31. Regular Sleeve
Standard sleeve for everyday wear.
Sewing Tip: Focus on comfort and proportion for casual garments.
How to Cut and Measure a Regular Sleeve
A regular sleeve (also called a set-in sleeve) is the most common sleeve type used in shirts, dresses, and blouses. It’s the classic style that’s sewn separately and attached to the armhole of the bodice. To make it fit perfectly, you need to measure, draft, and cut it accurately.
What You’ll Need
-
Measuring tape
-
Pattern paper or fabric
-
Ruler (preferably a French curve or hip curve)
-
Pencil or tailor’s chalk
-
Scissors
Step 1: Take the Correct Body Measurements
Before drafting your sleeve, measure the following:
-
Armhole (or Armscye) Circumference
Measure around the armhole of your bodice pattern (front + back). This helps match the sleeve curve to the armhole. -
Arm Length
Measure from the tip of the shoulder down to the desired sleeve length — for a short, three-quarter, or long sleeve. -
Bicep (Upper Arm) Circumference
Measure around the fullest part of your upper arm. Add about 2–3 inches (5–7.5 cm) for ease. -
Wrist Circumference (for long sleeves)
Measure around your wrist and add about 1 inch (2.5 cm) for comfort.
Step 2: Draft the Sleeve Pattern
-
Draw a Vertical Line (Center Line)
This represents the grainline and helps keep the sleeve balanced.
Label the top as “A” and the bottom as “B.” -
Mark the Sleeve Cap Height
From point A, measure down about ⅓ of the armhole measurement and mark point C. This is your cap height — it shapes the upper curve of the sleeve. -
Draw the Bicep Line
From point C, draw a horizontal line to both sides of the center line.
Half of the bicep measurement + ease goes to the left, and the other half to the right. -
Shape the Sleeve Cap Curve
Using a French curve, connect the ends of the bicep line smoothly to the top point (A). The front curve is slightly deeper than the back curve to fit the front armhole. -
Mark the Sleeve Length
From point A, measure down the desired sleeve length to point B. Draw a horizontal line at the wrist level. -
Shape the Wrist Line
On the wrist line, mark half the wrist circumference + ease on both sides of the center line, then connect it up to the underarm points with straight lines.
Step 3: Cut Out the Sleeve
-
Cut along the drawn outline.
-
Remember to add seam allowances (usually ½ inch or 1.2 cm) around the edges.
-
Label the sleeve as “Front” and “Back” — mark a small notch or dot on the front side to make sewing easier.
Step 4: Test the Fit
Before cutting your final fabric:
-
Cut a test sleeve in muslin or scrap fabric.
-
Pin or baste it onto your bodice armhole.
-
Check that it fits smoothly around the shoulder without pulling or puckering.
-
Adjust the cap height or bicep width if needed.
Tips for a Perfect Regular Sleeve
-
Always match the notches (front, back, and shoulder) when attaching the sleeve.
-
Press the sleeve cap gently after sewing for a professional finish.
-
Add gathers or easing stitches if the sleeve cap is slightly larger than the armhole.
Common Mistakes Across All Sleeves
-
Ignoring Fabric Behavior: Heavy fabrics don’t puff well; stretchy fabrics need smaller seams.
-
Uneven Gather/ Pleat: Causes asymmetry.
-
Incorrect Armhole Fit: Too tight = restricted movement, too loose = sagging.
-
Skipping Basting: Makes final sewing messy and less precise.
Learning how to sew different types of sleeves transforms basic sewing into true garment artistry. From the simplicity of a regular sleeve to the drama of Marmaluke or Tsunami long sleeves, each design has unique construction and proportional requirements. Focus on accurate measuring, proper fabric choice, careful cutting, and precise sewing to avoid common mistakes. With patience and practice, mastering sleeves will elevate your sewing projects to a professional level.
FAQs
Q1: How do I choose the right sleeve type for my garment?
A: Consider fabric weight, garment style, and occasion. Flowing fabrics suit poet or draped sleeves, while structured fabrics are better for padded or epaulet sleeves.
Q2: Can I add gathers or pleats to any sleeve?
A: Most sleeves can be modified, but ensure enough fabric for fullness. Too little fabric will cause tightness.
Q3: How much seam allowance should I add for sleeves?
A: Typically 1.2–1.5 cm for side seams; for gathers, add more to allow even distribution.
Q4: How do I fix a sleeve that is too tight at the shoulder?
A: You can add a small gusset under the arm or slightly increase the sleeve cap width.
Q5: How do I maintain symmetry between left and right sleeves?
A: Use a template or fold the fabric and cut both sleeves simultaneously to ensure identical pieces.
Q6: What fabrics work best for draped or flowing sleeves?
A: Lightweight fabrics like chiffon, silk, satin, or georgette are ideal. Heavier fabrics won’t drape well.
Q7: Can men’s sleeves be styled like women’s sleeves?
A: Yes, but consider arm mobility and professional appearance; subtle variations work better than extreme puff or flared designs.
Sleeve Measurement & Cutting Guide
| Sleeve Type | Key Measurements | Cutting Notes | Sewing Tips | Diagram |
|---|---|---|---|---|
| Kurti Sleeve | Arm length, bicep width, wrist width | Straight or slightly tapered | Small hem, soft fabric | ️ Illustration of a straight sleeve |
| Tsunami Long Sleeve | Shoulder width, elbow flare, wrist circumference | Cut generously for dramatic flair | French seam recommended | ️ Flared sleeve with measurements |
| Beauregard Sleeve | Shoulder puff height, wrist width | Puff at the shoulder, taper to the wrist | Gather evenly | ️ Puff with taper |
| Melon Sleeve | Upper arm circumference, dome height | Symmetrical dome | Baste first | ️ Dome-shaped sleeve |
| Gauntlet Sleeve (Pointed) | Elbow width, wrist width | Sharp taper | Careful seam alignment | ️ Pointed sleeve diagram |
| Poet Sleeve | Shoulder width, cuff width | Full flow | Lightweight fabric | ️ Gathered at the shoulder and cuff |
| Gibson Girl Sleeve | Shoulder puff, upper arm width, wrist | Vintage fullness | Extra ease at top | ️ Puff to wrist taper |
| Mahoitres Sleeve | Draped fold width, arm length | Pleats/folds | Pin pleats before stitching | ️ Draped sleeve |
| Hanging Sleeve | Shoulder drop, sleeve length | Soft drape | Minimal interfacing | ️ Hanging effect |
| Over Sleeve | Layering width | Ensure the underlying sleeve neat | Optional pleats or gathers | ️ Layered sleeve |
| Wing Ruffle Sleeve | Ruffle length, arm width | Add extra fabric for ruffle | Even gathering | ️ Ruffled edge |
| Epaulet Sleeve | Shoulder width | Reinforce epaulet | Interfacing | ️ Shoulder piece |
| Drawstring Puff Sleeve | Bicep width, wrist | Adjustable drawstring | Even gathers | ️ Puff with a drawstring |
| Draped Sleeves | Fabric length, fold depth | Extra fabric for folds | Test on muslin | ️ Draped sleeve |
| Bag/Barrel Sleeve | Arm circumference, length | Straight tubular shape | Precise arm measurement | ️ Barrel sleeve |
| Butterfly Sleeve | Shoulder width, length | Lightweight fabric | Rolled hem | ️ Butterfly shape |
| Dalmatian Sleeve | Bicep width, wrist | Patterned fabric | Balance prints | ️ Puff with spots |
| Marmaluke/Virago Sleeve | Shoulder and upper arm | Pleats/volume | Reinforce | ️ Voluminous pleated |
| Petal Sleeve (Lapped) | Overlapping curve length | Align layers | Smooth finish | ️ Petal overlap |
| Padded Shoulder Sleeve | Shoulder width, pad height | Light padding | Avoid bulk | ️ Padded diagram |
| Dolman/Magyar Sleeve | Armhole width, wrist width | Wide shoulder, narrow wrist | Extra shoulder fabric | ️ Wide armhole taper |
| Square Armhole Sleeve | Armhole, wrist | Straight seams | Accurate measurement | ️ Square shape |
| Peasant Sleeve | Shoulder and wrist | Gathered top and bottom | Elastic or drawstring | ️ Gathered ends |
| Pagoda Sleeve | Elbow width, wrist flare | Flared | Symmetry important | ️ Flared diagram |
| Frill/Flute Sleeve | Arm width, frill length | Add fabric for ruffles | Even gathering | ️ Frill edge |
| Cape/Circular Sleeve | Shoulder width, circular radius | Full circular cut | Fabric drape affects hang | ️ Circular sleeve |
| Juliet Sleeve | Upper arm width, puff height | Puff at the shoulder | Careful gathering | ️ Puff shoulder taper |
| Man’s Shirt Sleeve with Cuff | Shoulder width, wrist circumference | Straight | Topstitch cuff | ️ Shirt sleeve diagram |
| Bracelet Sleeve (3/4) | Elbow to wrist | Fit snugly | Finish with hem | ️ 3/4 sleeve diagram |
| Extended Cap Sleeve | Shoulder width | Slight extension | Clean edge | ️ Cap sleeve |
| Regular Sleeve | Arm length, bicep, wrist | Standard | Comfortable | ️ Straight sleeve |

")
")